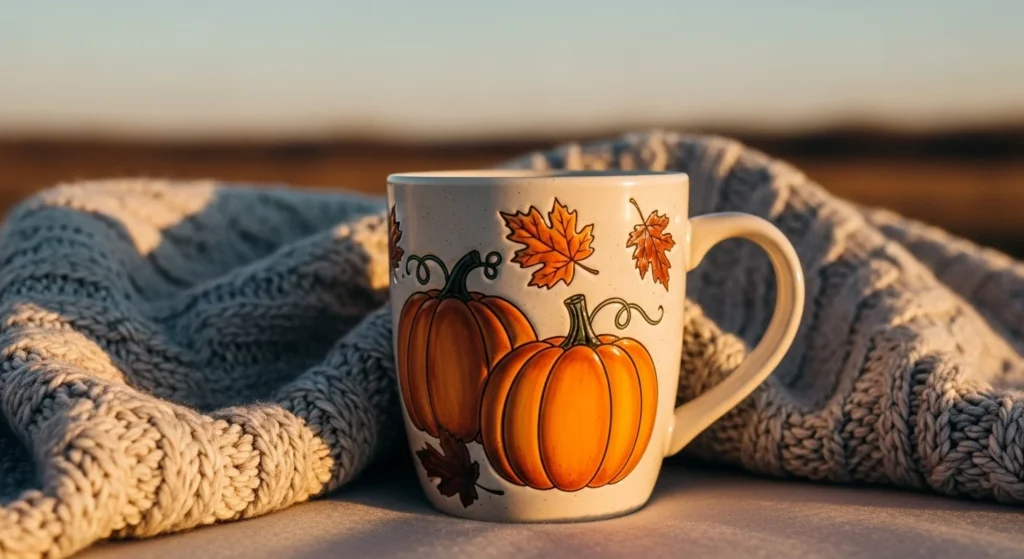
How to Make a Cozy Fall Mug with Sublimation
Make a cozy fall mug with sublimation by printing your mirrored design on sublimation paper, tightly wrapping and taping it to a polyester-coated mug, then heating it with a mug press or dedicated convection oven.
Use the right temps and pressure for the blank, cool carefully, and finish with a gentle wipe. This guide walks you step by step.
Materials & Tools You’ll Need
Quick list, so you can grab what’s missing before you start.
Supplies
- Sublimation-compatible mug blank, 11 oz or 15 oz, ceramic with polyester coating
- Sublimation paper
- Sublimation ink (for your specific printer)
- Heat resistant tape (sublimation tape)
- Lint roller, gloves, clean cloth
Tools
- Sublimation printer (Sawgrass or Epson converted with sublimation ink)
- Mug heat press or mug press attachment, or a dedicated convection sublimation oven and shrink-wrap/silicone sleeve
- Heat-proof gloves or tongs
- Scissors or craft knife, ruler
Want your designs to match exactly what’s on screen? These 5 steps to perfect color matching will save you a lot of guesswork.
How to Make a Cozy Fall Mug with Sublimation: Step-By-Step

Prep your design
- Choose a cozy fall design, like leaves, pumpkins, plaid backgrounds, warm color overlays, or a photo with warm filters.
- Set document size to the printable area for your mug blank (commonly 8.5 x 3 inches for 11 oz, check the blank).
- Mirror the image horizontally, export as a high-resolution PNG or JPEG 300 DPI.
Print on sublimation paper
- Load your printer with sublimation paper and select highest quality print mode.
- Print using the correct ICC/profile for your sublimation ink and paper.
- Let the print dry briefly, handle by the edges.
Prep the mug
- Clean the mug with a lint roller or alcohol wipe to remove dust, oils, fingerprints.
- Place the printed design on the mug, image-side down, positioned where you want it to appear.
Wrap and secure
- Wrap the paper tightly with no air pockets, align seam under the handle.
- Use heat-resistant sublimation tape along the paper edges and seam, top and bottom.
- Optionally use a silicone mug wrap or shrink sleeve for oven use, or silicone wrap for extra contact in a mug press.
Heat transfer
- Mug press: Preheat, set temperature and time, insert the mug, close and run the cycle. Typical mug press cycles are around 160–240 seconds depending on mug type and press.
- Convection sublimation oven: Place wrapped mugs in shrink sleeves, preheat oven, bake per blank instructions, remove with gloves, and cool as recommended. Never use a household oven for items that will be used for food later.
- After heat cycle is complete, remove mug carefully with gloves. Peel paper and tape off immediately or after a short cool, as your process requires.
Cool and finish
- Cool mug with gloves or a cooling plate. Some pros dunk in warm water to speed release of the paper if using shrink-wrap.
- Wipe lightly, inspect for missed areas and color fidelity. Re-sublimate only if you used a thermostat-tested blank and know the cause of failure.
Check our 10 Ultimate Fall Sublimation Ideas
Design Tips For A Cozy Fall Look
- Stick to warm palettes: burnt orange, deep burgundy, mustard, olive.
- Use layered textures: add subtle linen or paper grain behind illustrations to create tactile depth.
- Keep text readable: high contrast between text and background, 12–16 point minimum for mugs.
- Photo mugs: add a warm photo filter, reduce highlights to avoid blown whites.
- Mock up the wrap at 100 percent to check seams and handle placement.
Wrapping A Mug For Sublimation
- Under-handle seam is standard, it hides the seam and helps alignment.
- Tape method: use thin strips of sublimation tape to secure edges and hold tight, avoid overlapping tape over the printed area too much.
- Shrink sleeve: good for convection ovens or multi-mug runs, shrink evenly with a heat gun, then bake.
- Silicone wrap: useful in mug presses to even out pressure and protect mug surface.
Temp, Time and Pressure (Reference Ranges)
Below are commonly used ranges, they vary by mug blank and equipment, so always run a test mug first.
| Mug Type | Typical Temp (°F) | Typical Time | Pressure |
|---|---|---|---|
| Ceramic, coated sublimation blank | 350–400°F | 150–240 seconds | Medium, snug |
| 11 oz ceramic in mug press | 350–385°F | 120–180 seconds | Light to medium |
| Polymer mugs | 375–390°F | 90–120 seconds | Medium |
| Convection oven (shrink sleeve) | 385–400°F | 10–15 minutes | Apply shrink sleeve for even contact |
Why test? Press calibration, coating thickness, and press fit change outcomes. Run a clean test mug and note your exact press, temp, and time combination so you can repeat reliably.
Can Cricut Mugs Be Used For Sublimation?
Yes with caveats. Cricut supports Infusible Ink products and notes that generic mugs labeled “sublimation compatible” may work, but results vary. Use mugs advertised as sublimation or Infusible Ink compatible, and expect the cleanest results with blanks designed for sublimation. If you plan to use Cricut blanks, follow Cricut’s prep and press recommendations closely.
Mug Sublimation For Beginners: Common Mistakes & Fixes
- Ghosting or faint prints: not enough heat, loose wrap, or paper moved. Fix by increasing dwell slightly or tightening wrap.
- Yellowing or brown spots: overcooking or mug coating reacting. Try slightly less time, a lower temp, or a different blank.
- Blurry image: printer or ICC/profile issues. Reprint with correct settings and ensure paper-to-mug is flawless.
- Tape melting: you used non-heat-resistant tape. Use tape made for sublimation.
Troubleshooting Quick Checklist
- Check that mug blank is truly sublimation-coated.
- Use heat-resistant tape only.
- Clean mug thoroughly, oil causes poor adhesion.
- Test a spare mug before committing an order.
- Keep a process log with exact time, temp, press and blank SKU.
When you’re setting up your printer for vibrant results, check out our guide on sublimation paper settings for color, brightness, and quality tweaks.
How to turn a regular mug into a sublimation mug
You can’t just grab any random mug and expect sublimation to stick. The key is the poly coating. Sublimation ink bonds with polyester, so the mug needs a special sublimation coating to accept the print.
Here’s what you can do:
- Buy a poly-coating spray made for ceramics and apply it evenly (follow the instructions carefully for curing).
- Or use a heat-resistant sublimation wrap with a sublimation coating insert.
- Honestly, the easiest route is just to buy blank sublimation mugs. They’re already coated, consistent, and give vibrant results. DIY coatings can work, but they’re not as durable or dishwasher safe.
Can you sublimate on Dollar Tree glass mugs?
Technically, yes, but there’s a catch. Most Dollar Tree glass mugs don’t have a poly coating, which means sublimation ink won’t transfer properly. You’ll need to either:
- Apply a sublimation spray coating first, or
- Use white sublimation HTV (for glass projects) as a base layer and then sublimate on that.
Without coating, the design will be faded, patchy, or wash right off. If you want consistent quality for selling, Dollar Tree mugs are better for vinyl crafts, not sublimation.
Can I sublimate any ceramic mug?
Nope, not all ceramic mugs are sublimation friendly. It’s not about the ceramic, it’s about the coating. Sublimation mugs are poly-coated ceramic, which is why the ink infuses and doesn’t wash away.
If you try to sublimate on a plain ceramic mug, the design will either barely show up or wash off completely. Always check the product listing for terms like:
- “Sublimation ready”
- “Poly-coated”
- “Suitable for sublimation printers”
Will sublimation come off in the dishwasher?
If the mug is properly coated and pressed with the right settings, sublimation prints are super durable and usually dishwasher safe.
But here’s when problems happen:
- DIY coated mugs may fade or peel after a few washes.
- Cheap blanks with thin coating lose vibrancy fast.
- Using the wrong temp or time can lead to weak transfers that wash out.
For long-lasting results, use high-quality sublimation mugs and follow recommended temperature and time settings. Many pros still recommend hand washing if you want to keep the colors bold for years.