
Sublimation Temperature Chart (Time & Temp Guide for Heat Press)
Finding the correct sublimation temperature and time can be frustrating because every blank requires slightly different heat press settings.
This guide includes a quick sublimation temperature chart for shirts, polyester fabrics, mugs, mouse pads, and other common blanks so you can press with confidence.
If your prints look faded, scorched, or blurry, the problem is usually incorrect heat or pressing time. The settings below will help you get vibrant, consistent results.
| Material | Temperature | Time | Pressure |
|---|---|---|---|
| Polyester shirts | 385–400°F | 45–60 sec | Medium |
| Ceramic mugs | 400°F | 180–240 sec | Medium |
| Mouse pads | 385°F | 45 sec | Medium |
| Tumblers | 360–375°F | 5–6 min | Medium |
| MDF boards | 375–400°F | 60 sec | Medium |
Learn how pressure and machine calibration affect results in this guide to sublimation heat press settings.
What Temperature Is Best for Sublimation?
The ideal sublimation temperature is 380°F to 400°F (193–204°C) for most polyester fabrics and coated blanks. Most sublimation transfers press for 45–60 seconds with medium pressure, though the exact time and temperature depend on the material being used.
Sublimation Temperature and Time Chart
The correct sublimation temperature and time depend on the material you are pressing. Most sublimation projects work best between 380°F and 400°F (193–204°C) with medium pressure.
Use the chart below to quickly find the recommended heat press settings for common sublimation blanks.
Quick Sublimation Temperature Chart
| Material | Temperature (°F) | Temperature (°C) | Time | Pressure |
|---|---|---|---|---|
| Polyester T-Shirts | 385–400°F | 196–204°C | 45–60 sec | Medium |
| 50/50 Polyester Blend | 375–385°F | 190–196°C | 45–60 sec | Medium |
| Ceramic Mug (Press) | 385–400°F | 196–204°C | 180–240 sec | Medium-Firm |
| Ceramic Mug (Oven) | 375°F | 190°C | 12–15 min | N/A |
| Tumblers (Oven) | 360–375°F | 182–190°C | 5–6 min | N/A |
| Hardboard / MDF | 375–400°F | 190–204°C | 40–90 sec | Medium |
Tip: Always check the manufacturer’s recommended heat press settings because sublimation coatings can vary slightly between blank suppliers.
📄 Free Download: Printable Heat Setting Tracker (PDF)
Keep this by your press to record your favorite temperature, time, and pressure combos. It’s perfect for beginners learning how to dial in consistent results.
Sublimation Shirt Temperature and Time
Polyester sublimation shirts usually press best at 385°F to 400°F for 45–60 seconds with medium pressure. Pre-press the shirt for 5–10 seconds first to remove moisture and prevent ghosting.
Material-Specific Sublimation Settings
Each material, from polyester to mugs, demands specific settings to avoid fading or scorching. With 70% of crafters blaming material mismatches for fails, here are precise temps and tips to ace your projects.
Polyester Fabrics (T-Shirts) Sublimation Temperature
High polyester (60%+) gives vivid colors. Pre-press 5-10s at 190°C to remove moisture.
- Settings: 190-204°C, 40-60s, medium pressure.
- Tip: Use Teflon sheet for even heat.
Ceramic Mugs and Hard Surfaces Sublimation Temperature
Use coated blanks for ink bonding. Mug press: 193-204°C, 180-240s, medium-firm pressure. Oven: 190°C, 12-15m, use shrink wrap, rotate.
- Settings (Press): 193-204°C, 180-240s.
- Settings (Oven): 190°C, 12-15m.
- Tip: Cool mugs fully to avoid cracks.
Polyester Blends (50/50) Temperature
Cotton-poly blends need coating spray for decent results. Colors may dull due to cotton.
- Settings: 190-193°C, 45-60s, medium pressure.
- Tip: Test coating on scrap, blanks cost $5-$15.
Canvas Tote Bags Temperature
Use 196°C, 45-60s, medium pressure. Even pressure prevents patches.
- Settings: 196°C, 45-60s, medium pressure.
- Tip: Use press pillow for thick bags.
Convection Oven vs. Heat Press: Key Differences
Choosing between a heat press and a convection oven depends on your project. Here’s a quick breakdown to help you decide.
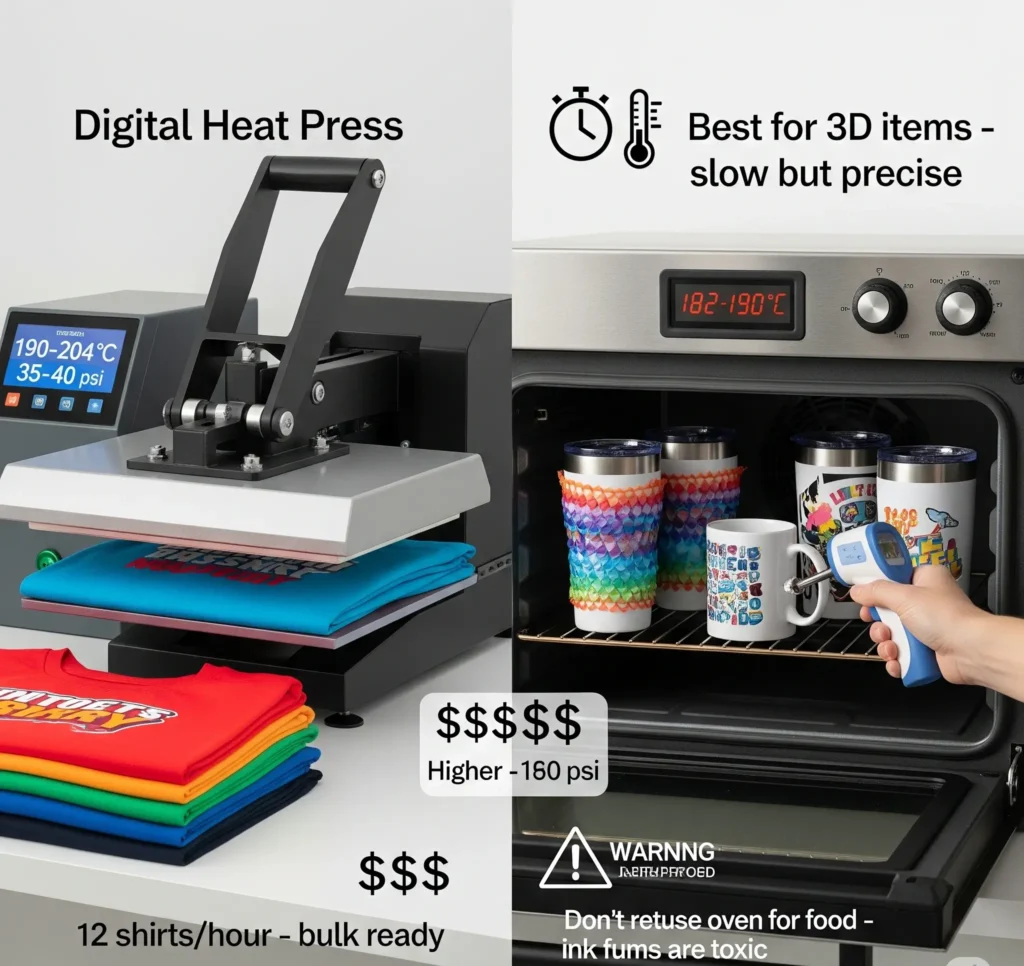
Heat Press Temperature Chart for Sublimation
Best for: Flat items like shirts, totes, and mouse pads
Time: 30–240 seconds
Temp: 190–204°C
Pressure: Medium (35–40 psi)
Cost: $200–$800
Why it works: Fast, even heat and pressure for sharp prints. Ideal for bulk jobs.
Real use: Made 12 shirts in an hour an oven can’t match that speed.
Convection Oven Temperature Chart for Sublimation
Best for: 3D blanks like mugs and tumblers
Time: 5–15 minutes
Temp: 182–190°C
Pressure: None—use shrink wrap
Cost: $100–$500
Why it works: Even heat circulation for curved surfaces. Needs rotation and careful temp checks.
Tip: Use a laser thermometer to check for hot spots. Helps avoid uneven prints.
Safety Reminder: Never reuse a sublimation oven for food. Ink fumes = toxic.
Money Saver: Blanks cost $5–$15 calibrate your gear before each run.
Quick Decision Chart:
| Feature | Heat Press | Convection Oven |
|---|---|---|
| Best For | Flat items | 3D items |
| Time | 30–240 sec | 5–15 min |
| Temp | 190–204°C | 182–190°C |
| Pressure | 35–40 psi | Shrink wrap |
| Cost | $200–$800 | $100–$500 |

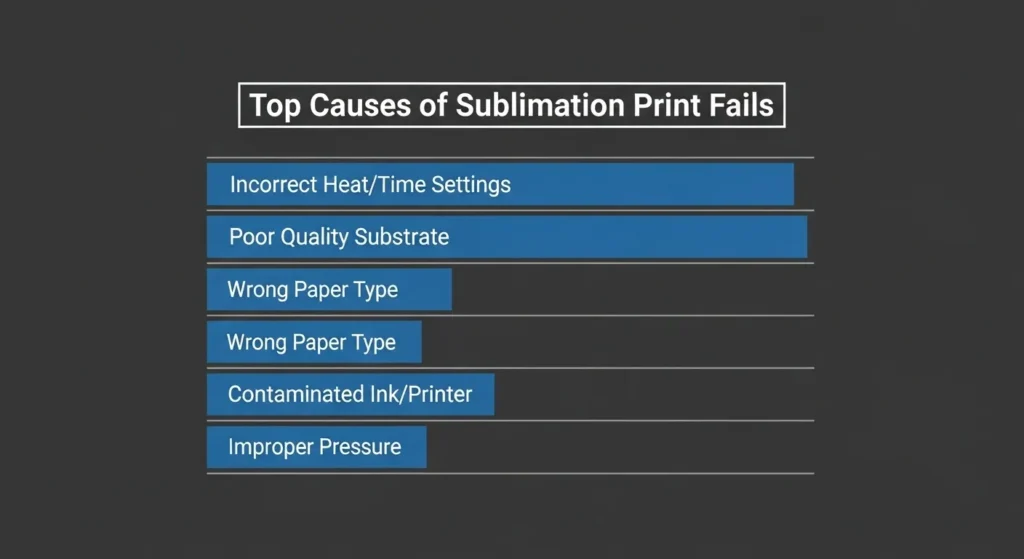
Troubleshooting Common Sublimation Issues
Nothing’s worse than a sublimation print gone wrong faded colors or blurry designs can tank your project. About 75% of crafters face issues like ghosting or scorching due to small mistakes.
Her we help you with quick fixes for common problems, so you can save your $5-$15 blanks and keep printing like a champ.
Faded Colors
Dull prints? Your temp or time’s likely too low.
- Fix: Bump temp by 5-10°C or add 5-10 seconds.
- Tip: Ensure 60%+ polyester for vibrant results.
Ghosting/Blurring
Blurry edges happen when paper shifts during pressing.
- Fix: Secure design with heat-resistant tape, use Teflon sheet.
- Tip: Check press alignment, uneven pressure causes slips.
Scorching
Yellowed or burnt blanks mean too much heat.
- Fix: Lower temp by 5-10°C, ease pressure.
- Tip: Pre-test on scrap to avoid ruining costly blanks.
Uneven Prints
Patchy designs signal hot spots or uneven pressure.
- Fix: Use a heat press mat, check for cold spots.
- Tip: Laser thermometer ensures consistent heat ($20-$50).
If your prints look dull, incorrect heat settings may be the cause. This guide explains
heat press temperature for sublimation in more detail.
What the Data Says: Real Sublimation Mistakes by the Numbers
Want to sublimate cotton + poly blends? Check out our step-by-step process: Sublimating 50/50 Cotton-Polyester Blends
Beginner Mistakes to Avoid
Even seasoned crafters slip up sometimes. These are the most common beginner mistakes that ruin otherwise great sublimation prints, and they’re all super easy to fix once you know what’s happening.
1. Skipping the Pre-Press Step
Moisture is the silent killer of crisp transfers. Always pre-press your polyester blanks for 5–10 seconds at 190°C (about 374°F) to remove trapped moisture before sublimating. It keeps your design from ghosting or blurring.
2. Ignoring Manufacturer Coating Specs
Not all blanks are created equal. Different coatings react differently to heat, especially EU vs. US-sourced products. Always check the label or the supplier’s heat chart before you press. A few degrees off can make or break color brightness.
3. Mixing Up Fahrenheit and Celsius
This one’s more common than you’d think. Using 400°C instead of 400°F will instantly scorch your blank. Double-check your press settings, and keep a conversion chart (like the one above) taped near your workspace for safety.
4. Overpressing Soft Fabrics
Too much pressure or time can flatten fibers and cause a shiny imprint. Stick to medium pressure (35–40 psi) and use a Teflon or parchment sheet to protect delicate materials.
💡 Pro Tip: Keep a “mistake log.” Jot down what went wrong, what settings you used, and what fixed it. Over time, that little notebook becomes your secret weapon for flawless prints.
Sublimation: The Science of Heat and Ink
Sublimation printing turns ink into gas, bonding it to polyester or coated surfaces like mugs for vibrant, lasting designs. It’s tricky, though, mess up the heat, time, or pressure, and your print’s faded or scorched.
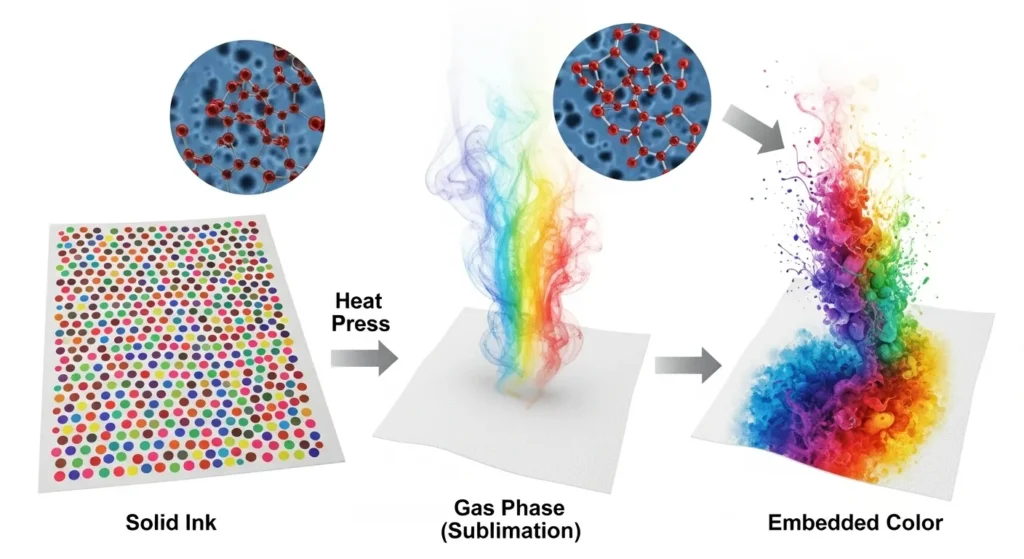
About 90% of pro sublimation uses polyester-based materials for their ink-grabbing power. Precision is everything: too low a temp (under 180°C) dulls colors, too high (over 210°C) causes ghosting or burns. Test on scrap first, blanks cost $5-$10!
Key factors:
- Temp: 190-204°C for most items
- Time: 40-60s for shirts, 3-15m for mugs
- Pressure: Medium (35-40 psi)
- Material: High polyester or coated
Pro Tips for Sublimation Success
You’re ready to take your sublimation game to the next level, and I’m here to help with pro tips that’ll make your prints pop without breaking the bank.
Nobody wants to waste $10 blanks on a dull design, and 80% of crafters say small tweaks make a huge difference. These concise, practical hacks, pulled from sources like Apex Transfers and Galaxy Press, will save you time and boost quality.
- Use top-notch paper and ink: High-quality sublimation paper (98% transfer rate, and inks (Apex Transfers) ensure vibrant colors. Cheap stuff fades fast.
- Pre-press fabrics: Zap moisture from polyester shirts with a 5-10 second pre-press at 190°C (Galaxy Press). It’s a game-changer for crisp prints.
- Skip 100% cotton: Cotton doesn’t hold sublimation ink without a coating. Stick to 60%+ polyester or coated blanks.
- UK crafters, check coatings: EU-sourced blanks may need slight temp tweaks due to unique coatings (Sublishop). Test first to avoid flops.
- Keep a log: Note your settings and results. I dodged a $15 blank disaster by tracking what worked for my press.
Frequently Asked Questions
What temperature is best for sublimation?
Most sublimation transfers work best between 380°F and 400°F (193–204°C) with medium pressure for about 45–60 seconds, though exact settings depend on the material being pressed.
What temperature and time do you use for sublimation shirts?
Polyester sublimation shirts usually press best at 385–400°F for 45–60 seconds with medium pressure. Always pre-press the shirt for 5–10 seconds first to remove moisture and prevent ghosting.
What temperature does sublimation ink activate?
Sublimation ink activates at around 380°F (193°C) when heat converts the ink into gas, allowing it to bond with polyester fibers or polymer-coated blanks.
Can I sublimate on 50/50 cotton-poly shirts?
Yes, but colors may appear lighter because cotton fibers do not bond with sublimation ink. Using polyester coating spray or sublimation HTV can help improve results.
What temperature should I use for sublimating polyester?
Polyester materials usually sublimate best between 385°F and 400°F (196–204°C) with medium pressure for 45–60 seconds, depending on the thickness of the fabric.
What temperature is used for sublimation mugs?
Most ceramic mugs sublimate at 385–400°F for 180–240 seconds in a mug press or 375°F for 12–15 minutes in a convection oven using shrink wrap.
Why do my sublimation prints look faded?
Faded sublimation prints usually happen when the temperature or pressing time is too low, the pressure is inconsistent, or the material does not contain enough polyester.
Do I need a heat press for sublimation?
A heat press is the most common tool for sublimation because it provides consistent heat and pressure, but convection ovens can also be used for curved items like mugs and tumblers.
What happens if sublimation temperature is too high?
If the temperature is too high, the blank may scorch, yellow, or cause ghosting, especially on light polyester fabrics.
What pressure should be used for sublimation?
Most sublimation transfers require medium pressure (around 35–40 psi) to ensure the ink gas bonds evenly with the material surface.


7 Comments