Sublimation Craft Fair Booth Layout: Free 10×10 Planner

A 10×10 craft fair booth gives you 100 square feet, but tables, tumblers, shirts, displays, checkout supplies, backstock, and your own working space can fill it quickly.
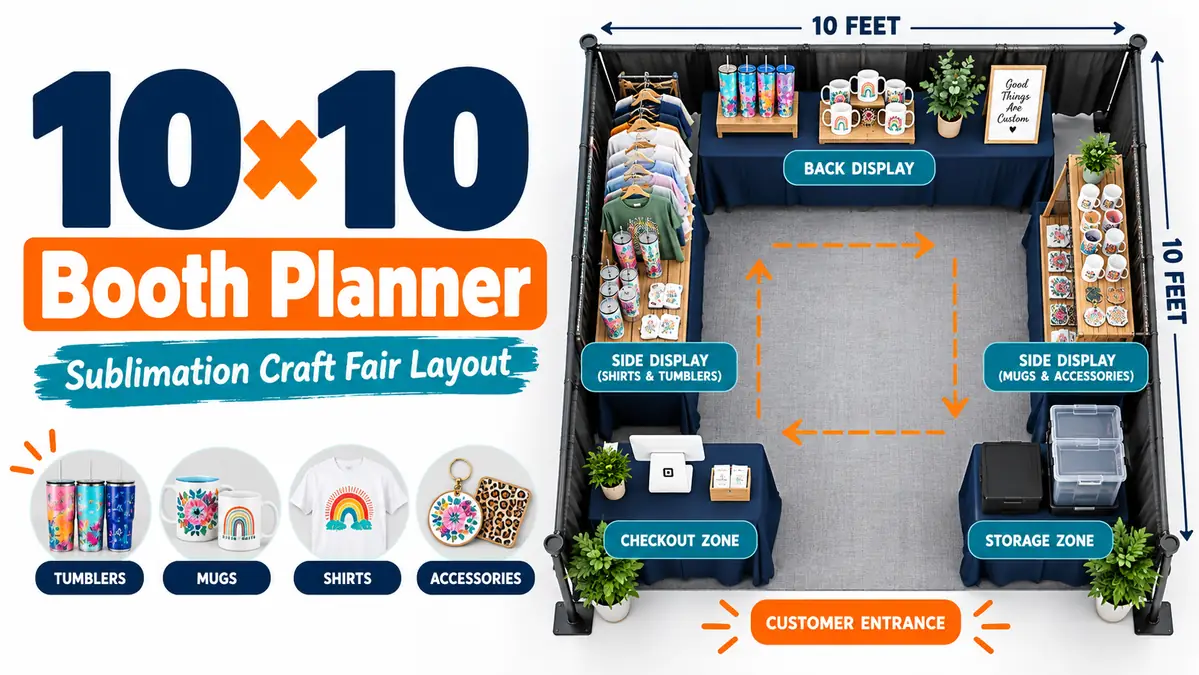
A good sublimation craft fair booth layout gives shoppers room to see products, step inside, browse, and pay without squeezing around boxes or display furniture. Use the free planner below to map the space before event day.
What the Free 10×10 Booth Planner Includes
The printable planner is built around the decisions that matter once you start placing real furniture and inventory inside the booth.
- Blank 10×10 one-foot grid
- One-table booth layout
- Two-table L-shaped layout
- Three-table open-U layout
- Corner-booth layout
- Checkout and backstock planning areas
- Product-zone worksheet
- Scale cut-out fixtures for testing different arrangements
Print the blank grid first and mark any fixed constraints before placing tables. These may include open aisles, neighboring booths, tent legs, walls, electrical access, or restrictions set by the event organizer.
If you are still deciding how much merchandise to bring, use the Craft Fair Inventory Planner before filling every available display surface.
Choose Your Booth Type Before Moving Any Tables
Start with the sides customers can actually use. A standard inline booth with only the front open needs a different layout from a corner booth exposed to traffic on two sides.
| Booth Type | Main Layout Priority |
|---|---|
| Standard inline booth | Create a clear front entrance |
| Corner booth | Keep both customer-facing sides visible |
| Multiple open sides | Avoid blocking natural cross-traffic |
| Indoor table space | Use display height without crowding the footprint |
| Outdoor canopy | Plan fixtures around the actual usable footprint |
Mark closed and open sides on the planner before adding furniture. This prevents a layout from looking balanced on paper while facing merchandise toward a wall, neighboring booth, or blocked side once you arrive.
Which 10×10 Craft Fair Layout Should You Use?
The right layout depends on inventory size, product type, display equipment, and how much browsing space you want inside the booth.
| Layout | Best Fit | Main Advantage | Main Trade-Off |
|---|---|---|---|
| One table | Small inventory or first events | Maximum open floor space | Limited display surface |
| L-shape | Mixed sublimation products | Good balance of display and access | One side carries more merchandise |
| Open U | Larger product range | More display surface | Easy to overcrowd |
| Corner layout | Two open customer aisles | Visibility from two directions | Requires different signage placement |
| Front counter | Orders or service-heavy selling | Simple seller-customer interaction | Less invitation to enter the booth |
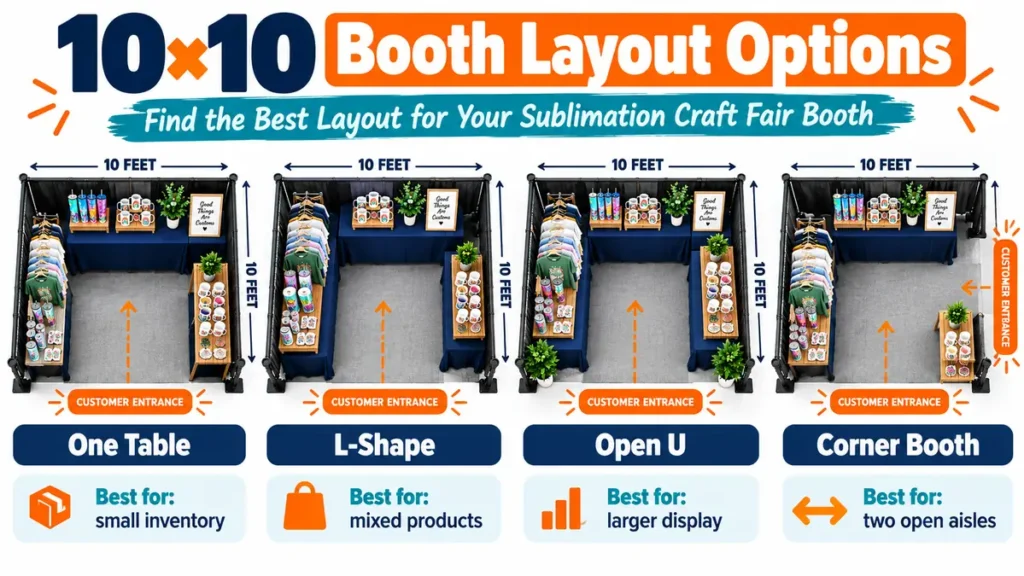
Do not choose by table count alone. Two well-merchandised tables with risers, racks, or vertical displays can be easier to shop than three tables covered edge to edge with products.
One-Table Layout for a Small Sublimation Booth
One table can work well in a 10×10 booth when you have a focused product line. Instead of placing it directly across the front edge, test moving it deeper into the booth so shoppers have room to step out of the aisle.
Simple one-table zones
- Featured products and clear prices on the main table
- Small impulse items near checkout
- One vertical shirt or tumbler display
- Hidden backstock under or behind the main display
- Checkout at one end rather than in the middle
A small collection does not automatically need another table. Extra open space can make a focused booth easier to understand and shop.
Two-Table L-Shaped Layout for Mixed Products
An L-shaped layout is a practical starting point for sublimation sellers carrying several product types. Place one table along the back or side, then turn the second table 90 degrees so the remaining opening becomes the customer entrance.
- Back table: tumblers, mugs, featured collections, or higher-value products
- Side table: keychains, coasters, magnets, smaller gifts, and checkout near the far end
- Under-table space: duplicate inventory and packing supplies
Use risers where they improve visibility rather than spreading every item flat across the table. The same basic L can also rotate for a corner booth.
Three-Table Open-U Layout for a Larger Product Mix
Three tables can fit inside many 10×10 arrangements, but physical fit is only the first test. Customers, the seller, checkout activity, packaging, and restocking still need room.
An open-U layout places tables along the back and sides while leaving the front open. Use the back table for the main visual collection, then give each side table one clear product category.
Use height before adding more furniture
- Risers
- Shelves made for your booth
- Apparel racks
- Grid displays
- Tiered tumbler holders
- Hanging displays where event rules allow them
Vertical merchandising lets shoppers see more without consuming the middle of the booth.
Corner Booth Layout for Two Open Aisles
A corner booth needs to work from two directions. Treat both exposed sides as entrances rather than using one as the front and accidentally blocking the other with furniture or storage.
- Keep product visibility from both aisles
- Make signage readable from both approaches
- Keep checkout away from either entrance
- Turn displays toward each customer approach
- Place backstock against a closed side when practical
Use the corner-planner page to test several orientations before deciding which displays face each aisle.
Where Sublimation Products Should Go in the Booth
Different sublimation products benefit from different display positions. Give each category enough room to be understood quickly rather than giving every product equal space.
| Product | Useful Display Zone | Why It Works |
|---|---|---|
| Keychains, magnets, coasters | Front or checkout area | Small items need little display space |
| Mugs | Stable side or back display | Keeps heavier items away from the entrance |
| Tumblers | Tiered or vertical display | Multiple designs remain visible without taking over the table |
| Shirts and apparel | Rack or back area | Uses vertical space instead of table space |
| Personalized samples | Near checkout | Supports custom-order conversations |
| Duplicate inventory | Under-table or rear storage | Keeps the selling surface cleaner |
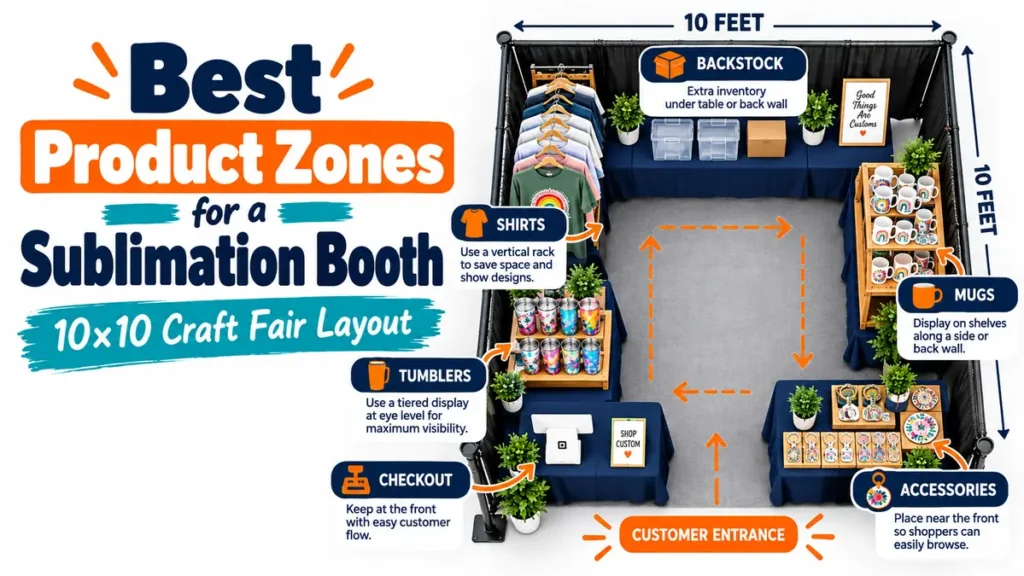
For help choosing the merchandise mix itself, see sublimation products for craft fairs. That page covers what to sell. This planner covers where those products go.
Plan Checkout, Storage, and Restocking Before the Show
A booth layout is incomplete until you know where the working supplies go. Mark checkout and storage before filling the remaining space with merchandise.
Checkout area
- Card reader, phone, or tablet
- Cash storage if you use it
- Bags and wrapping supplies
- Receipts or order forms
- Business cards
- Custom-order information
Keep these items together so a sale does not turn into a search through several boxes.
Backstock and personal items
Store duplicate merchandise close enough to restock without crossing the whole booth. Under-table storage often works well when covered tables are already part of the layout. Keep personal items in their own spot so water, bags, chargers, and jackets do not migrate onto product displays.
Test Your 10×10 Booth at Home Before Event Day
A paper layout catches obvious problems. A full-size practice setup catches the ones that measurements miss.
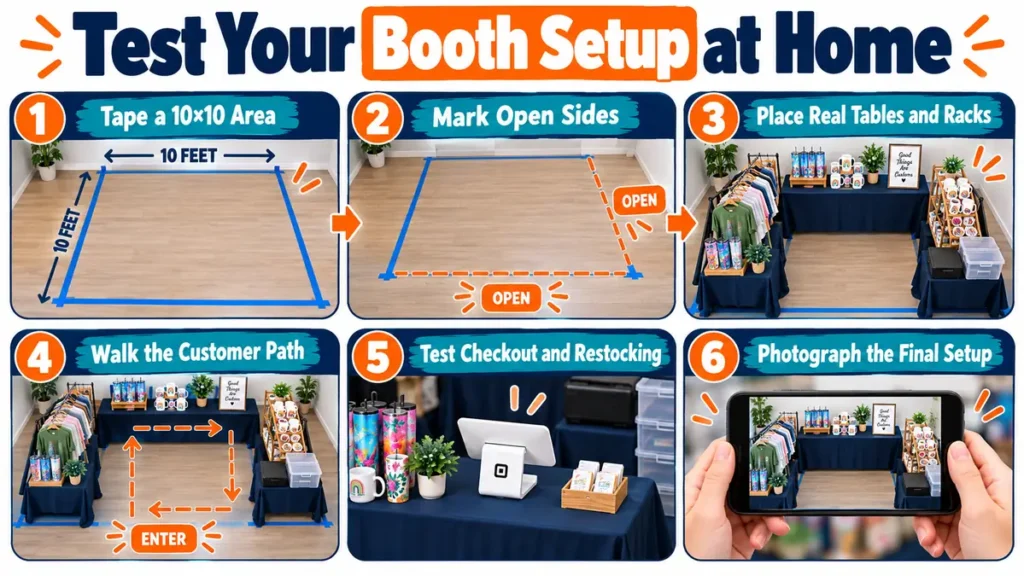
1. Mark a 10×10-foot square
Use removable tape or another suitable marker on a driveway, garage floor, spare room, or other safe space. The outside line represents your assigned booth boundary.
2. Mark the customer-facing sides
Label entrances, closed sides, neighboring vendors, and any fixed restrictions you already know about.
3. Set up the real tables and racks
Use the same table lengths, shelves, racks, and checkout furniture you plan to take. A generic rectangle on paper cannot show how awkward a deep table or wide rack may feel.
4. Walk the booth like a customer
Enter from each open side, stop at displays, reach toward products, turn around, and carry a shopping bag through the space. A layout that feels comfortable while empty can feel much tighter once people start browsing.
5. Test checkout and restocking
Walk from a product display to payment while holding an item. Then pretend a popular product has sold out and retrieve its replacement. Move checkout or backstock if either task blocks the customer path.
6. Photograph the final setup
Take photos from the front, each open side, inside the booth, and the checkout position. Bring those photos to the event so you can rebuild the tested layout without relying on memory.
7 Booth Layout Mistakes to Fix Before Load-In
- Blocking the entire entrance with a table. This turns the booth into a counter and limits walk-in browsing.
- Using too many flat tables. Try adding height before adding another large horizontal surface.
- Putting checkout in the busiest browsing spot. Transactions and browsing should not need the same piece of floor.
- Displaying every duplicate. Keep replacement stock in backstock unless multiples help the customer choose.
- Planning only for the front. Corner booths need visibility from more than one direction.
- Making prices hard to find. Shoppers should be able to compare products without asking for every price.
- Skipping the practice setup. Test the real furniture before load-in day.
Use the Planner With Your Inventory and Profit Numbers
Booth layout is one piece of craft-fair planning. The strongest setup combines three decisions: what to sell, how much to bring, and where everything should go.
- Choose your products with the craft-fair product guide.
- Estimate quantities with the Craft Fair Inventory Planner.
- Check your numbers with the Sublimation Profit Margin Calculator.
- Return to the 10×10 planner and give the most important products enough display space.
That order prevents the number of empty tables you own from controlling the business decision.
Frequently Asked Questions
What is the best layout for a 10×10 craft fair booth?
An L-shaped or open-U layout is a useful starting point for many 10×10 booths because both can leave a clear customer entrance while providing substantial display space. A smaller inventory may work better with one table and vertical displays.
Can three 6-foot tables fit in a 10×10 booth?
Three 6-foot tables can physically fit in some 10×10 arrangements, depending on table depth and orientation. Add the real table dimensions to the planner and test the setup at full size so shoppers, checkout, storage, and the seller still have workable space.
Where should checkout go in a craft fair booth?
Place checkout where a transaction can happen without blocking the main entrance or strongest product display. A side or back-corner position often works well when it still gives the seller easy access to packing supplies and backstock.
How do you display sublimation tumblers without cluttering the table?
Use a tiered or vertical display so several tumbler designs stay visible without taking over the entire table. Show representative designs and keep duplicate inventory in backstock.
What is the best layout for a corner craft fair booth?
A corner booth should use both customer-facing aisles. Keep the exposed sides visually open, place larger fixtures along closed sides where practical, and position signage so shoppers can understand the booth from either approach.
How should I practice my booth setup before a craft fair?
Mark a full 10×10-foot area at home, place the real tables and displays inside it, and test browsing, checkout, restocking, and storage. Photograph the final arrangement once it works so you have a visual reference during event setup.
Plan the Booth Before You Pack the Car
Print the blank 10×10 grid and mark every open side first. Then place tables, checkout, product displays, and storage on the planner before building the layout at full size.
Test the booth with your actual fixtures, fix the uncomfortable areas, and photograph the final setup. Changes made at home are much easier than moving tables and inventory after the craft fair has started.