11 oz vs 15 oz Sublimation Mug Wrap Templates: Free Sizes & Downloads

Your mug wrap prints at the right size on screen, but the paper either overlaps the handle or stops short of the printable area. The fix starts with the blank, not another generic template. An 11 oz or 15 oz label tells you capacity, not the exact artwork dimensions.
Use the free sublimation mug wrap templates below as supplier-labeled paper-fit references, then check the dimensions of the mug you actually have. The pack includes an 11 oz template, a 15 oz template, an editable SVG layout, and a calibration worksheet. Print a paper test at 100% before transferring artwork to a coated mug.
Download the Free 11 oz and 15 oz Mug Wrap Templates
Choose the file that matches your actual blank, not just its ounce label. These two PDF examples use published imprint areas from HeatPressNation and are designed for print-size checks, not for direct pressing onto a mug.
| Free file | Reference blank | Listed imprint area | Use |
|---|---|---|---|
| 11 oz example PDF | HeatPressNation ORCA Premium white ceramic mug | 8.2 × 3.7 in | Print a 100% paper-fit outline for that supplier’s 11 oz reference |
| 15 oz example PDF | HeatPressNation SubliCraft white ceramic mug | 8.6 × 4.3 in | Print a 100% paper-fit outline for that supplier’s 15 oz reference |
| Editable SVG inside ZIP | Start from the 11 oz example; change dimensions in a vector editor | User-defined | Build an exact-size artwork layout for your own mug |
| Calibration worksheet PDF | Any straight-sided compatible mug | User-recorded | Measure the blank, log the handle gap, and confirm a printed 1 in square |
Download the four free files:
- 11 oz ORCA mug paper-fit template (PDF) — supplier example, 8.2 × 3.7 in.
- 15 oz SubliCraft mug paper-fit template (PDF) — supplier example, 8.6 × 4.3 in.
- Editable mug wrap layout (SVG inside ZIP) — extract the SVG before editing its size.
- Mug measurements and one-inch print calibration worksheet (PDF) — record your actual blank’s fit.
Before using the PDFs: Select Actual size or 100% in your print dialog and turn off Fit to page. Measure the one-inch calibration square with a ruler. If it is not exactly one inch, correct the scaling before judging the wrap’s fit. The printed PDF outlines contain guide marks; do not press those markings onto the mug.
Source dimensions: HeatPressNation ORCA 11 oz product specifications and HeatPressNation SubliCraft 15 oz product specifications.
Which file format should you choose?
A PDF is easiest for checking a physical outline with a ruler. An SVG is more useful when you need to adjust the canvas size without losing sharpness. A PNG can work for final artwork, but verify both its pixel dimensions and printing scale instead of relying on a software preview.
The templates are blank guides, not ready-made commercial artwork. Create your own design inside the measured area and hide or delete guides before printing the production transfer.
11 oz vs 15 oz Sublimation Mug Wrap Template Sizes
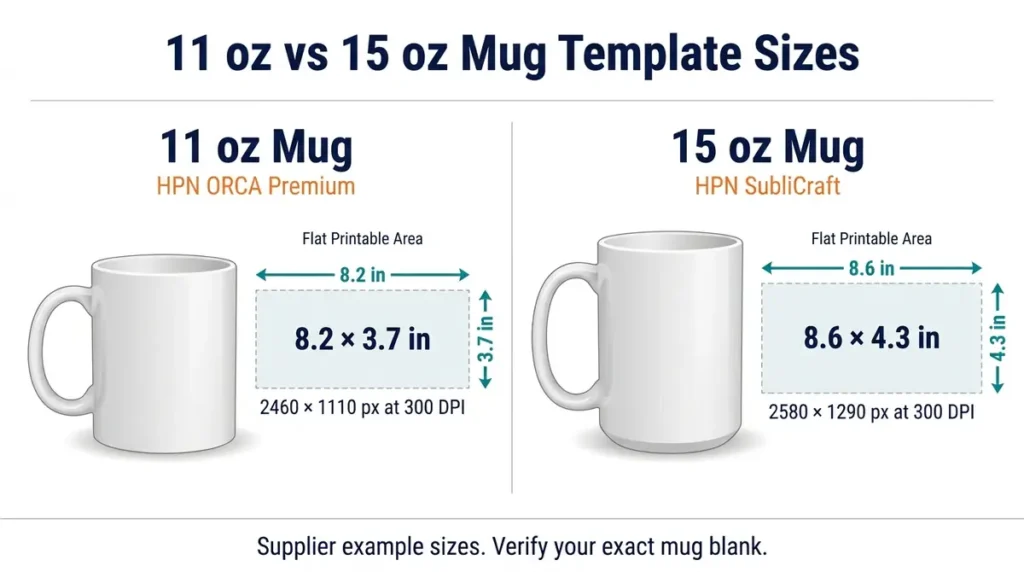
There is no one-size-fits-all 11 oz or 15 oz mug template. Even mugs with the same advertised capacity can have different bodies, coatings, handle clearances, or straight printable heights.
| Source and blank | Maximum listed image/imprint area | Pixels at 300 DPI | What to know |
|---|---|---|---|
| HeatPressNation ORCA Premium 11 oz | 8.2 × 3.7 in | 2460 × 1110 px | Product-specific supplier imprint area |
| HeatPressNation SubliCraft 15 oz | 8.6 × 4.3 in | 2580 × 1290 px | Product-specific supplier imprint area |
| Cricut 15 oz mug | 8.75 × 4.25 in maximum design | 2625 × 1275 px | Different product; use Cricut’s matching setup and clearance instructions |
Cricut’s Mug Press FAQ lists the maximum design size for its 15 oz blank and specifies at least 0.5 in between the design edge and mug handle. Treat this as Cricut guidance for its supported mugs and press, not a universal measurement for all blanks.
The pixel calculation is straightforward: inches × 300 = pixels at 300 DPI. For instance, an 8.2-inch-wide layout needs 2,460 pixels at 300 DPI. But a large pixel count does not correct the wrong physical dimensions.
An 11 oz template stretched to fill a 15 oz blank can distort artwork. Starting over with the actual 15 oz printable dimensions is safer than resizing only by height or width.
How to Measure Your Mug for a Wrap
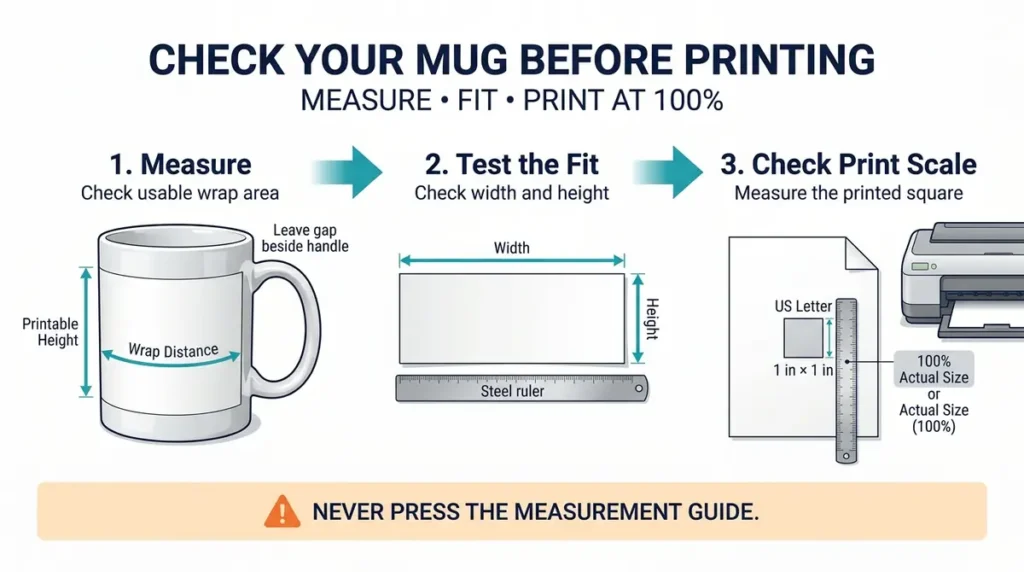
Measure the surface that can take a flat transfer, then check the handle gap. A flexible paper strip and a ruler are enough to test the fit without wasting a coated mug.
- Check the listing. Find the exact blank’s manufacturer, product name or SKU, and documented printable area. Do not substitute total mug height for printable height.
- Measure the straight area. Hold a ruler against the vertical section you can wrap smoothly. Stop before curved lips, beveled bases and raised details.
- Check usable width. Wrap a narrow strip of ordinary paper around the straight printable band, leaving the handle and any press-specific clearance unobstructed. Mark its endpoints and measure the strip flat.
- Mark the center opposite the handle. Fold your test strip in half if the artwork is intended to sit opposite the handle. For two-sided designs, check each side in relation to how the customer will hold the mug.
- Paper-test the layout. Print the appropriate guide at actual size, cut around its outline, and place it on your exact mug. If it reaches a curved or unpressable area, reduce the design canvas.
If a mug is tapered rather than straight, a rectangular wrap may twist or wrinkle. For tapered drinkware, the tumbler wrap size calculator explains how the top and bottom measurements affect the layout.
Handle clearance and the printable area are different
The supplier’s imprint area tells you the listed design region. It does not necessarily guarantee that every press heats the entire region evenly. Handle clearance, attachment method, press fit and the mug’s straightness affect where the design can transfer cleanly.
For Cricut Mug Press, Cricut’s compatible-mug instructions specify leaving at least 0.5 inch from the handle and pressing only on a smooth, straight area. For a different mug press, follow its equipment documentation and the blank supplier’s instructions.
How to Place Artwork on Your Mug Wrap
Decide what should face the viewer before you arrange the artwork. The center of the template is usually opposite the handle, but single-sided and double-sided designs have different placement goals.
| Design style | Layout decision | Quick check |
|---|---|---|
| Full-width artwork | Keep the background inside the usable printable region and account for any exposed handle gap | Paper-wrap around both handle sides |
| One-sided image or name | Place the focal point on the side meant to face the viewer | Hold mug by the handle and confirm orientation |
| Two-sided design | Place each design on its intended side with space around the handle | Check left-hand and right-hand viewing orientations |
| Text or faces | Give important details extra room inside the outer edge of the measured area | Avoid placing critical text against a cut edge |
Bleed means extending artwork beyond a final intended trim edge, while the safe zone keeps text and important details farther inside. Neither should be applied as a guessed universal measurement for every mug. Add them only when the blank supplier, your chosen workflow, or a successful physical test calls for them.
A handle-gap diagram can help explain placement, but always compare the diagram with the actual blank. Avoid promising a perfectly continuous wrap around the handle.
How to Print a Mug Template at 100% Size
The measurement shown in your design program matters less than the size of the paper that comes out. Confirm the PDF’s one-inch square or the SVG’s exported dimensions before producing transfers.
- Download the relevant template and open it in a PDF viewer or supported design program.
- Select US Letter landscape, 11 × 8.5 in, for the supplied print-check PDFs.
- Choose Actual size, 100% or the equivalent. Turn off fit-to-page, shrink-to-fit and automatic print scaling.
- Print the guide on plain copy paper. Measure the calibration square. It should be 1 × 1 in.
- Cut out the outer rectangular outline. Wrap the paper around the blank, with the printed side facing outward, and mark where the real handle clearance begins.
- Adjust the artwork canvas to your usable area. Build the final design in a clean copy without measurement text, outlines or calibration marks.
- Follow the paper and ink supplier’s transfer-printing instructions, including mirroring when required for the process. Do not mirror the measurement-only PDF just to check fit.
Canva, Photoshop and SVG sizing
In Canva or Photoshop, set the document size in inches and use the exact blank measurement. At 300 DPI, multiply width and height by 300 to calculate a raster canvas size. Verify the exported physical dimensions before printing.
For the editable SVG, open the file in a vector editor such as Inkscape or Illustrator, set the document to your measured width and height, and resize the outer layout to match. The starter SVG uses an 8.2 × 3.7 in example. Remove or hide its measurement guides from the final production export.
For Cricut Mug Press projects, the official Mug Design Setup instructions are specific to its supported mug shapes and materials. Do not assume a generic rectangle substitutes for the built-in setup on beveled or stackable mugs.
Why Your Mug Wrap Does Not Fit
Check physical dimensions and the paper test before changing pressing temperature. A sizing problem is not necessarily a heat problem.
| Symptom | Likely first check | Practical adjustment |
|---|---|---|
| Paper prints smaller than the template measurements | Printer scaling or page fit setting | Use actual size; verify the 1 in square |
| Wrap touches the handle | Blank’s real usable width and clearance | Narrow the design and paper-test again |
| Background leaves an unintended white gap | Wrong width, alignment or unsuitable artwork layout | Remeasure and position the background intentionally |
| Top edge wrinkles | Curvature, taper or excess printed height | Reduce height to the straight printable band |
| 11 oz template is distorted on a 15 oz mug | Aspect ratio mismatch | Start with the correct supplier-specific dimensions |
| Pressed edges are faint but paper fits | Contact, press coverage or blank compatibility | Check press and supplier instructions, not just canvas size |
| Letters appear reversed after transfer | Transfer orientation and mirroring | Confirm the required mirror setting for that workflow |
Paper fitting only tests geometry. A printed transfer can fit yet produce fading, ghosting or uneven color if the press cannot maintain suitable contact. See the separate mug sublimation process guide for preparation, pressing and transfer troubleshooting.
Mug Sublimation Template FAQs
What size should an 11 oz mug wrap be?
It depends on the exact mug. HeatPressNation lists an 8.2 × 3.7-inch imprint area for its ORCA Premium 11 oz ceramic blank. Other manufacturers may use a different printable width or height. Verify the product listing and make a full-size paper-fit test rather than treating that number as universal.
What size should a 15 oz mug wrap be?
For HeatPressNation’s SubliCraft 15 oz ceramic mug, the listed imprint area is 8.6 × 4.3 inches. Cricut’s supported 15 oz mug has a maximum design area of 8.75 × 4.25 inches. Follow your own mug supplier’s dimensions and your press’s clearance requirements.
Can I use the same artwork for 11 oz and 15 oz mugs?
You can reuse the same design elements, but re-layout the artwork for each blank’s measured dimensions. Stretching the image to fit can distort faces, logos and circles. Keep the artwork’s proportions while changing the placement and background to suit the new mug.
Should a mug wrap include bleed?
Only add bleed when it serves the intended trim, transfer or fit method. It should not put text or faces into an area the press may not reach. Start with the supplier’s imprint dimensions, identify the actual safe region, and test with paper before committing a full-background design.
Can I print the templates on US Letter paper?
Yes. The two included paper-fit PDFs are laid out on US Letter landscape pages at their listed physical dimensions. Print at 100% and measure the one-inch calibration square. They are measurement guides; create a separate clean design file for your actual transfer artwork.
Do I need to mirror a sublimation mug design?
For a transfer placed ink-side against a mug, artwork is normally mirrored so it appears correctly after transfer. Check the printing or material supplier’s workflow, since software may offer a separate mirror setting. The downloadable measurement PDFs should be printed normally when you are only checking physical size.
Start With the Mug, Then Size the Artwork
The right sublimation mug wrap template is the one that matches your actual blank and press, not a generic ounce label. Use the 11 oz or 15 oz printable as a starting point, verify the one-inch reference square, then trim the paper around the real printable area. Once the paper fits, move the measured dimensions into a clean artwork file and make a controlled test transfer.
If you need other printable product layouts, the sublimation templates overview covers additional items. For cups that taper, use the wrap size calculator instead of forcing a flat rectangular mug guide.