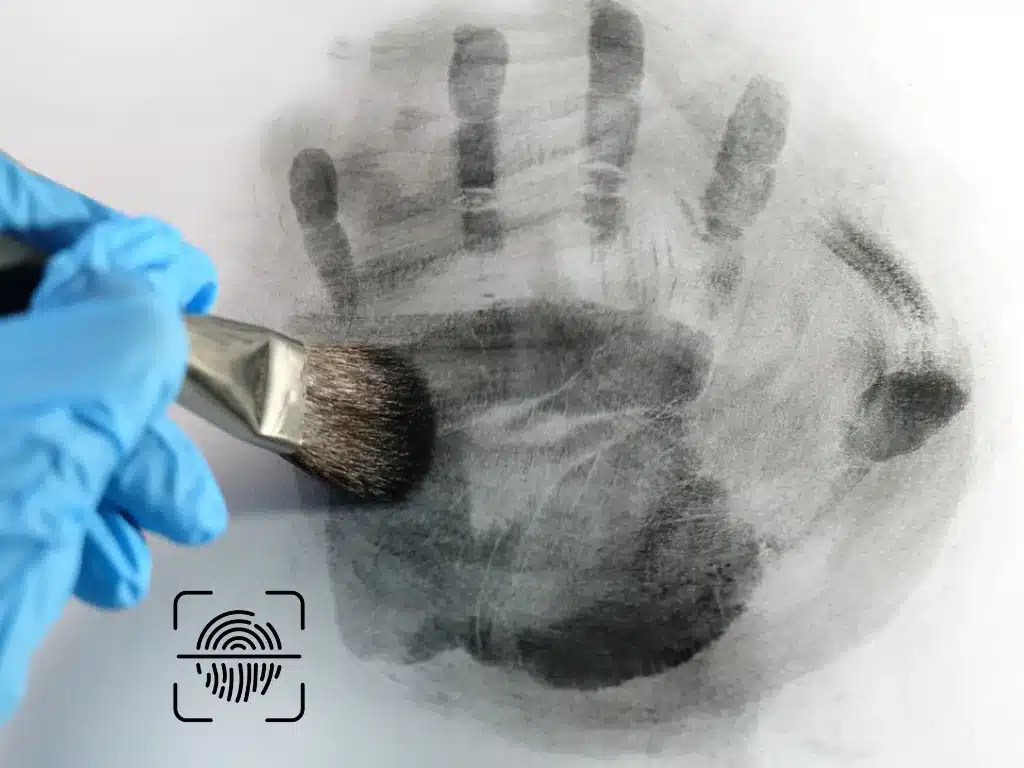
How to Recover Prints Using DFO (1,8-Diazafluoren-9-one)
DFO (1,8-diazafluoren-9-one) is a forensic chemical used to develop invisible amino-acid-based fingerprints, especially on porous surfaces like paper, cardboard, and untreated wood. When applied, DFO reacts with trace sweat residues and produces a bright red fluorescence under green or UV light, making faint or aged prints clear enough to photograph.
This guide explains how to prepare DFO, apply it safely, and troubleshoot weak or incomplete prints.
What Is DFO?
DFO (1,8-diazafluoren-9-one) is a chemical reagent used to develop latent fingerprints that contain amino acids. First introduced in forensic labs in the 1990s, DFO is 2–3 times more sensitive than ninhydrin, especially on old or low-quality prints.
Why Forensic Experts Use DFO
Studies by the UK Home Office found that DFO can develop:
- 20–40% more identifiable ridge detail than ninhydrin on porous surfaces
- High-quality fluorescence ideal for digital imaging and courtroom evidence
- Strong results even on aged documents (up to 20+ years old)
How DFO Works
When someone touches a surface, they leave behind tiny amino acids from sweat.
DFO binds to these amino acids and forms a compound that fluoresces under 530 nm green light or UV light, revealing the fingerprint pattern.
This makes DFO especially effective for:
- Old, degraded, or faint prints
- Low-moisture environments
- Documents exposed to handling or environmental wear
Materials You Need
- DFO powder
- Ethanol (analytical grade)
- Distilled water
- Glass beaker or container
- Spray bottle or dipping tray
- Gloves and protective eyewear
- UV or forensic light source (green 530 nm recommended)
- Fume hood or ventilated room
Safety note: DFO should never be heated above recommended temperatures. Always work in a ventilated area.
How to Prepare the DFO Solution
1. Wear protective gear
Gloves, eye protection, and good ventilation are essential.
2. Mix the reagent
- Add 1 g of DFO to 100 ml ethanol.
- Stir until fully dissolved.
- Add 10 ml of distilled water and mix gently.
3. Transfer to a spray bottle or immersion tray
Both methods work depending on the surface.
How to Develop Prints with DFO (Step-by-Step)
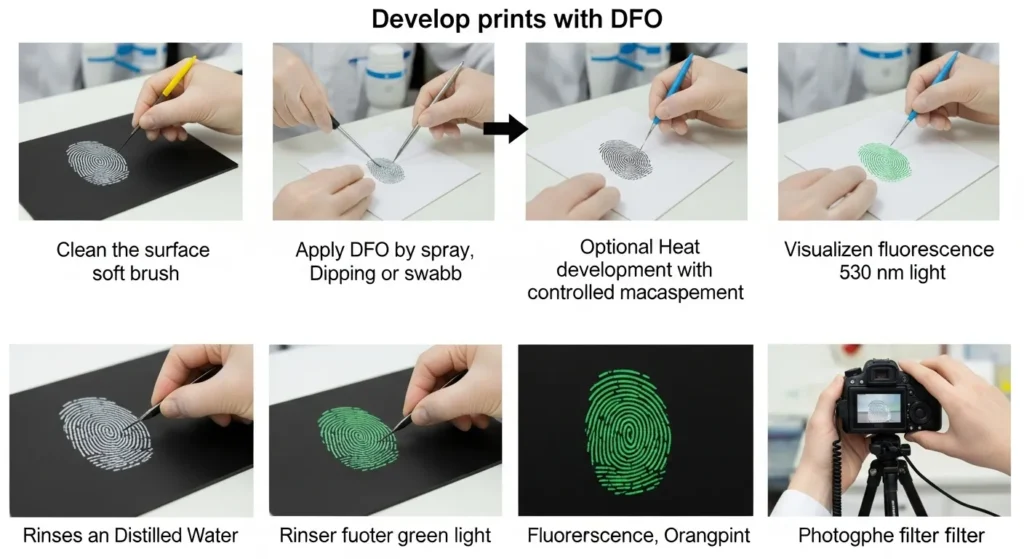
1. Clean the surface
Use a soft brush or swab to remove dirt. Avoid vigorous rubbing.
2. Apply the DFO
Choose one method:
- Spray the solution evenly
- Dip documents for maximum coverage
- Swab if treating a small area of interest
3. Allow the reagent to react
Let it sit for 5–10 minutes.
4. Optional: Heat development
Many forensic labs heat DFO-treated items to 80–100°C for 10 minutes to increase fluorescence.
For at-home or classroom demonstrations, do NOT apply heat unless trained.
5. Rinse
Rinse lightly with distilled water to remove excess reagent.
6. Visualize the print
Use:
- 530 nm green forensic light (best)
- UV light (works but less sensitive)
7. Photograph for documentation
Use a camera with:
- Orange barrier filter
- Tripod
- Low ISO to reduce grain
Additional Tips for Better Results
Works best on:
- Paper, notebooks
- Cardboard
- Currency
- Envelopes
- Raw wood
Can also work on:
- Fabric
- Painted surfaces
- Human skin (rare but documented in case studies)
If the print is still faint:
Try sequential processing:
- DFO
- Ninhydrin
- Physical developer
This combination recovers 90–95% of amino-acid based prints according to studies from the International Fingerprint Research Group (IFRG).
How to Recover Prints Using DFO
Have you ever seen detectives on TV dusting for fingerprints? Sometimes, the prints can’t be seen with the naked eye, but they can still be recovered with a unique technique called DFO. In this guide, I’ll explain how DFO works and how to recover prints.
Additional tips
- DFO works best on porous surfaces like paper or cardboard.
- If the entity is too large to be sprayed, you can soak a cotton swab in the DFO solution and rub it on the surface.
- If the print is still not visible after using DFO, you can try using other fingerprint processing techniques in conjunction with DFO.
Real-World Case Study
The “Envelope Trace” Investigation (UK Forensic Science Service)
In a burglary investigation, police recovered a partially torn envelope from a suspect’s backpack. Ninhydrin produced only a weak partial ridge pattern. When DFO was applied, the fluorescence revealed a complete identifiable fingerprint, linking the envelope to handling at the crime scene.
DFO produced 3× more ridge clarity than ninhydrin in this case.
Common Mistakes to Avoid
- Spraying too heavily (causes smearing)
- Applying to wet or greasy surfaces
- Using low-quality ethanol
- Holding the UV light too close or too far
- Skipping the post-rinse step
FAQs
Frequently asked questions (FAQs)
Q. What is the difference between DFO and ninhydrin?
Ninhydrin is another chemical that can be used to develop latent prints. It reacts with amino acids in the same way as DFO, but it creates a purple-colored compound instead of a fluorescent one. Ninhydrin is more commonly used on non-porous surfaces like metal or plastic.
Q. Can DFO be used on all types of surfaces?
DFO works best on porous surfaces like paper or cardboard but can also be used on other surfaces like fabric or skin.
Q. How lengthy does it bring to process a print using DFO?
Treating a print with DFO can take 5-10 minutes, depending on the surface being treated and the concentration of the solution. The print may be visible immediately or may require further treatment to become visible.
Q. Is DFO harmful to humans?
DFO can be harmful if ingested or inhaled in large amounts, so wearing gloves and protective eyewear is essential.is essential.
Q. Can DFO be used in conjunction with other fingerprint processing techniques?
DFO can be used with techniques like ninhydrin or cyanoacrylate (super glue) fuming to enhance the visibility of latent prints.
Explore the world of sublimation and printers with our comprehensive guide, for more information or a step-by-step how-to guide.
Summary
This guide taught us about DFO, a chemical to develop latent fingerprints. We explained how it works and what materials are needed and provided a step-by-step guide. We also included additional tips and answered some frequently asked questions. With this information, you can recover prints like a real detective!
If you appreciate this guide, share it with friends who love crime shows or forensic science. And if you have any other questions or tips for How to Recover Prints Using DFO, leave them in the comments below.