DTG Printer Maintenance
DTG printer maintenance helps keep your machine printing clean, consistent shirts without clogs or downtime. Simple daily routines like head cleanings, proper storage, controlled humidity, and using quality ink make a big difference. Regular service checks prevent bigger repairs and help your DTG printer last longer while saving you time and money.
If maintenance feels overwhelming, the DTG printing beginner guide shows how the entire workflow fits together from prep to production.
Daily DTG Maintenance Checklist
A few minutes of consistent care each day keeps your DTG printer running smooth, prevents clogs, and reduces the chance of repairs or downtime.
1. Essential Daily Cleaning Tasks
Run a fresh nozzle check to spot any drifting channels early. Wipe the capping station, wiper blade, and surrounding printhead area using a lint-free cloth and DTG-safe cleaning solution. This removes lint and ink mist before it hardens.
2. Preventing Nozzle Clogs and Ink Separation
White ink settles fast, so shake the cartridges gently or use the circulation feature. A quick light cleaning keeps pigment moving without wasting ink. If this step is skipped, the white channels dry first and banding usually follows.
3. Proper Shutdown and Storage Conditions
Let the printer finish its shutdown cycle and never power off mid-process. Keep the lid closed and maintain room humidity between 40 and 60 percent. Low humidity lets nozzles dry out overnight, even on healthy printheads.
4. Common Daily Mistakes to Avoid
Pretreat overspray, skipped wipe-downs, and letting the printer sit unused for days all increase the risk of clogs. Using the wrong cloth can also scratch surfaces or push lint into sensitive areas.
If you’re trying to understand how different machines hold up over time, this DTG printer comparison gives you a clear look at reliability, maintenance needs, and print quality across major brands.
Weekly Deep-Care
Monthly Maintenance
Pro Tips & Red Flags
If you want to see how maintenance impacts your earnings, try running your numbers through the DTG profit calculator.
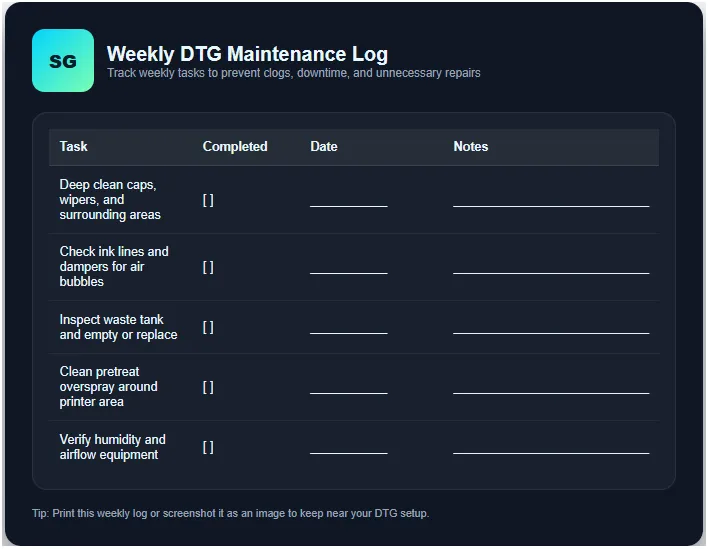
Weekly DTG Maintenance Checklist
Weekly routines catch issues that daily cleanings can’t and help keep the printhead sealed and healthy.
1. Deep Clean the Caps, Wiper, and Surrounding Areas
Remove dried ink from the capping station, wiper blade, and nearby surfaces. Ink mist builds slowly and prevents the head from sealing if you ignore it.
2. Run a Full Nozzle Check
Print a complete nozzle pattern and perform a light clean only if needed. Save heavy cleans for stubborn clogs.
3. Inspect Dampers and Ink Lines
Look for air bubbles or residue inside the dampers. Bubbles cause banding and unstable ink pressure.
4. Check or Empty the Waste Tank
A nearly full tank can trigger error stops mid-production. Clear it before it interrupts print jobs.
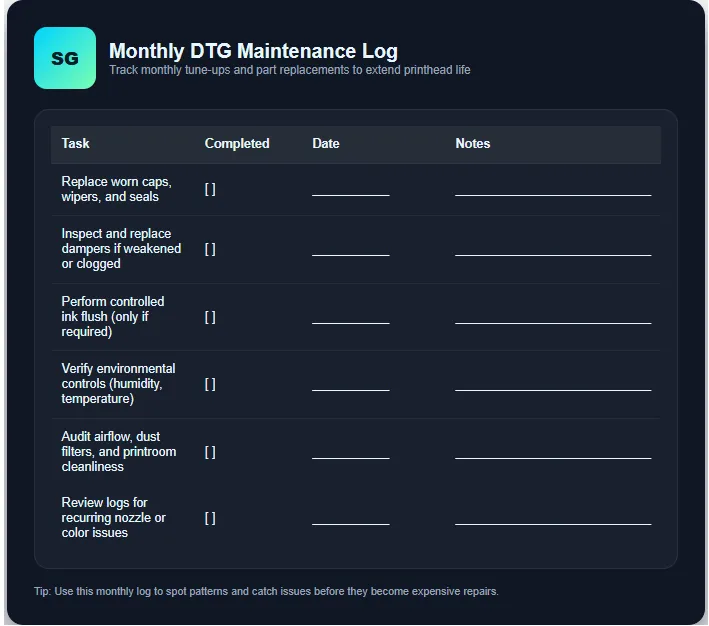
Monthly DTG Maintenance Checklist
Monthly upkeep protects long-term printhead health and keeps the internal system stable.
1. Replace Wipers, Caps, and Filters
These consumables wear down from daily ink exposure. Replacing them early protects the printhead seal.
2. Perform an Ink Flush Only When Needed
Flush the system after long idle periods or when switching ink types. Avoid unnecessary flushing to reduce waste.
3. Verify Humidity and Room Temperature
Rooms drift over time, so check that humidity stays between 40 and 60 percent and the temperature stays stable.
4. Log Part Changes, Errors, and Recurring Behavior
A good maintenance log helps diagnose patterns early and reduces future repair time.
If you run an Epson system, the Epson DTG printers guide breaks down common care routines and quirks specific to these models.
Environmental Factors That Affect DTG Printer Life
Your environment matters as much as your cleaning routine. A controlled, clean workspace prevents clogs, protects the printhead, and keeps your DTG printer running longer with fewer surprises.
Ideal Humidity and Temperature Levels
DTG printers run best at 40 to 60 percent humidity with a steady room temperature, typically around 68 to 77°F. When humidity drops, ink dries faster inside the nozzles. When it climbs too high, the machine becomes sluggish and pretreat reacts inconsistently. A simple hygrometer keeps you from guessing.
How Dust, Airflow, and Workspace Impact Performance
Dust buildup is one of those slow problems that sneaks up on you. Lint, fibers, and pretreat overspray settle around the printhead and cap. Poor airflow just makes it sit there longer. A clean room, light air filtration, and wiping down equipment keep contaminants away from delicate parts that rely on a perfect seal.
Safe Ways to Store Ink and Pre-Treat Liquids
Ink and pretreat perform differently depending on how you store them. Keep bottles in a cool, stable place away from direct light. Always close lids tight, store them upright, and avoid leaving pretreat open near your printer. When liquids age or thicken, you get banding, separation, or clogged internal lines.
If you’re new to the industry, this roundup of the top DTG printers for beginners explains which models are easiest to maintain.
Troubleshooting Early Signs of DTG Printer Problems
Trust the early signs. The moment prints look off, diagnose the cause before it becomes a full-blown repair. Quick reactions prevent costly downtime and extend the life of your DTG printer.
Symptoms of Failing Printheads
One of the first signs is a stubborn nozzle that won’t return even after a light clean. You might see faint banding, weak white ink coverage, or areas where color looks washed out. If a channel disappears completely, the printhead is telling you it’s under stress and needs attention fast.
Banding, Color Shifts, and Dull Prints
Banding usually means uneven ink flow or dried nozzles. Color shifts often point to separated white ink or environmental changes like low humidity. When images look dull, it’s usually pre-treat overspray, settling ink, or worn caps that aren’t sealing properly. Each of these issues has the same message: something’s disrupting consistent ink delivery.
When DIY Fixes Work and When They Make Things Worse
Light cleans, circulation, shaking white ink, and wiping down your maintenance station are usually enough for small issues. But if you need repeated heavy cleans or manual purges, stop. Forcing the machine can push dried pigment deeper into the lines or burn out the printhead. That’s when calling a tech saves you money in the long run.
For budgeting repairs and regular upkeep, the DTG printing cost breakdown helps you understand the real expenses behind owning a printer.
When You Need Professional DTG Printer Service or Repair
When small issues keep coming back or your printer starts losing channels repeatedly, stop forcing it. A trained technician can prevent a minor clog from turning into a full printhead replacement.
How to Tell If You Need a Technician
You don’t need a tech for every clog, but certain symptoms are red flags you shouldn’t ignore.
Common signs you need professional service:
- Channels won’t recover even after multiple light cleans
- Sudden or repeated nozzle loss
- Ink leaking around the head or capping station
- Pumps running louder or longer than normal
- Air constantly returning in dampers or ink lines
- Prints show severe banding or color dropout that keeps returning
- System errors related to pressure or temperature
If you’re seeing more than one of these, something internal is failing.
DTG Printer Repair vs Routine Service
Here’s a quick breakdown so you know which situation you’re dealing with.
| Type | What It Means | Typical Triggers | Cost Impact |
|---|---|---|---|
| Routine Service | Preventive cleaning & part replacement | Worn caps, wipers, mild buildup | Low to moderate |
| Repair Work | Fixing failed components | Printhead issues, cracked lines, pump failure | Moderate to high |
| Emergency Repair | Printer down, can’t run jobs | Sudden clogs, electrical faults, contamination | Highest |
Knowing where your issue lands helps you decide how quickly to call a tech.
What a Standard DTG Service Appointment Includes
A good technician does more than clean. They look at the entire system, inside and out.
Typical service checklist:
- Inspecting and replacing wipers, caps, and seals
- Cleaning the capping station, pump, and wiper assembly
- Checking dampers for clogging or pressure issues
- Flushing ink lines if needed
- Tightening fittings and verifying vacuum pressure
- Testing printhead performance under load
- Checking environment, humidity, and workflow issues
- Updating firmware or software if required
If a tech only runs cleanings, they’re not giving you a full service.
Finding Reliable DTG Repair Near You
Not every “printer repair shop” knows DTG. Look for someone who specializes in direct-to-garment systems.
What to look for in a good DTG technician:
- Experience with your specific brand or model
- Ability to diagnose over the phone before a visit
- Transparent pricing for service and travel
- Emergency or after-hours availability
- Good reputation in local print groups or forums
- Optional maintenance plans or recurring tune-ups
- Ability to train you on proper care
If someone seems unsure about white ink systems, they’re not the right fit.
How Much DTG Printer Maintenance and Repairs Cost
A DTG printer isn’t cheap to maintain, but most costs are preventable. A few minutes of daily care can save you thousands in repairs and lost production.
Typical Service Rates and Part Replacements
Costs vary by brand and location, but most shops pay similar ranges for routine service and common parts.
| Item / Service | Typical Cost | Notes |
|---|---|---|
| Routine service visit | $150–$350 | Cleaning, inspection, adjustments |
| Emergency repair visit | $300–$700+ | Rush scheduling or after-hours adds more |
| Printhead replacement | $500–$2,000+ | Model-dependent, most expensive repair |
| Dampers (set) | $40–$120 | Replace every few months for stable pressure |
| Wipers / capping station | $20–$100 | Frequent replacement prevents head damage |
| Pump assembly | $150–$350 | Fails faster if ink dries in the system |
| Waste tank | $20–$60 | Needed more often for high-volume shops |
The printhead is where most owners feel the pain, which is why preventive care pays off.
Hidden Costs Most Owners Overlook
Some expenses don’t look like “maintenance,” but they add up fast.
Often-forgotten costs:
- Wasted shirts from banding or color shifts
- Ink lost from heavy cleaning cycles
- Downtime when waiting for parts or a technician
- Extra pretreat use from test prints
- Replacement of contaminated or expired ink
- Lost revenue from delayed customer orders
These hidden costs are usually bigger than the repair bill itself.
How Good Maintenance Saves Thousands Over Time
Good habits reduce cleaning cycles, extend consumable life, and protect the printhead. A well-maintained DTG printer can run for years without major failures.
Maintenance habits that dramatically cut costs:
- Daily wipe-downs and fresh nozzle checks
- Replacing caps and wipers before they fail
- Keeping humidity stable so nozzles don’t dry
- Cleaning pretreat overspray regularly
- Shaking white ink and circulating daily
- Logging changes so you spot patterns early
Shops that follow a routine often go 18–36 months without replacing a printhead. Others who ignore the basics replace one every few months.
For shops deciding between digital and traditional setups, the DTG vs screen printing guide shows how maintenance varies between the two.
Is a DTG Printer Worth It if Maintenance Is So High?
A DTG printer pays off when it’s used consistently in a controlled environment with basic daily care. If your workflow matches what the machine needs, the maintenance is a small price for the print quality and speed you gain.
Realistic Ownership Expectations
DTG isn’t a plug-and-print machine. It needs daily attention, white-ink circulation, proper humidity, and a clean workspace. Shops that treat it like an office printer usually end up with clogs, downtime, and high repair bills. When the workflow is consistent, though, DTG produces sharp, vibrant prints with fast turnaround times.
Comparing DTG vs DTF Maintenance Requirements
Both technologies have upkeep, but they behave differently. Here’s a quick comparison to help you judge what fits your setup.
| Factor | DTG | DTF |
|---|---|---|
| Daily maintenance | Moderate, focused on white ink and station cleaning | Low to moderate |
| Printhead risk | Higher if humidity drops or print volume is low | Lower, but film handling adds steps |
| Consumable costs | Ink, pretreat, maintenance parts | Film, powder, ink |
| Workflow | Direct-to-shirt, soft feel | Print, powder, cure, transfer |
| Ideal environment | Controlled humidity, clean room | More forgiving, less humidity-sensitive |
If you want the softest prints possible with a fast production flow, DTG still wins. If you want fewer maintenance steps and broader fabric compatibility, DTF may feel easier.
Cost, Skill Level, and Production Volume Considerations
Where DTG really shines is steady production. The more you print, the smoother the machine runs. Shops printing a handful of shirts a week will fight more clogs than high-volume shops. Skilled operators also make a big difference, DTG rewards consistency and penalizes neglect.
Think about:
- Your weekly print volume
- Whether you can maintain humidity
- Your comfort with routine upkeep
- Space for pretreat, curing, and storage
- Budget for consumables and minor parts
DTG makes the most sense when you print often enough to justify the machine and can follow a simple care routine.
Who DTG Printing Makes Sense For (and Who It Doesn’t)
DTG is worth it for:
- Apparel brands printing full-color designs
- On-demand shops offering fast turnaround
- Businesses with steady weekly volume
- Anyone who wants soft, retail-quality prints
DTG is not ideal for:
- Extremely low-volume shops
- Workspaces with inconsistent humidity
- Users who dislike routine cleaning
- Shops that want to print on every fabric type
DTG vs DTF Printer Maintenance: Key Differences
DTG requires more environmental control and daily care, while DTF offers an easier maintenance rhythm for busy or smaller shops. The best choice depends on how much time you can give to your equipment and how consistent your production schedule is.
Which Requires More Daily Cleaning
DTG needs more attention because of white ink settling, nozzle sensitivity, and the importance of a perfect seal on the capping station. DTF still uses white ink, but the printhead is generally less stressed because film, not fabric, touches the ink. Most users say DTF feels more forgiving if you skip a day.
Daily maintenance quick comparison:
- DTG: Nozzle checks, wiping caps and wipers, circulating white ink, cleaning overspray
- DTF: Nozzle check, small wipe-down, occasional agitation of white ink
If you can’t commit to daily routines, DTF usually causes fewer headaches.
If you’re weighing other print methods, this DTG vs DTF vs sublimation vs embroidery comparison breaks down maintenance and workflow differences clearly.
Ink Behavior, Printhead Stress, and Workflow
DTG fires ink directly into fabric fibers, and cotton absorbs moisture differently based on the environment. That means the printhead works harder, and humidity matters more. DTF lays ink onto film, so the printhead stays cleaner and sees less resistance.
Key stress differences:
- DTG nozzles dry faster if humidity drops
- Pretreat overspray affects DTG cleaning cycles
- DTF printheads stay cleaner because fabric fibers never reach them
Lower stress usually means fewer deep cleans and fewer emergency repairs.
How Maintenance Impacts Long-Term Profitability
A well-maintained DTG printer delivers unmatched softness and great color on cotton, but poor care leads to high repair costs. A DTF setup can run longer between cleanings, making it appealing for shops that want predictable upkeep.
Here’s a simple long-term view:
| Category | DTG | DTF |
|---|---|---|
| Maintenance cost | Medium to high | Low to medium |
| Environmental sensitivity | High | Moderate |
| Printhead lifespan (with good care) | Excellent | Excellent |
| Risk when neglected | Very high | Moderate |
| Overall upkeep difficulty | Higher | Lower |
Neither system is “better,” but one will fit your habits better than the other.
Expert Tips to Extend Your DTG Printer’s Lifespan
A DTG printer lasts years longer when you follow the same simple routines every day. The more consistent your maintenance, the fewer surprises and repair bills you’ll face.
Best Practices From Technicians
Most techs agree that consistent care is more important than deep cleaning. The goal is to stop buildup before it forms.
What techs recommend:
- Do a fresh nozzle check every morning
- Clean caps, wipers, and surrounding areas before they dry out
- Shake or circulate white ink daily to prevent settling
- Keep humidity stable so nozzles don’t dry overnight
- Use high-quality ink and pretreat, not off-brand mixes
- Avoid stacking pretreat tasks near your machine
These habits reduce strain and help your printer warm up smoothly every day.
Maintenance Tools and Supplies Worth Keeping On Hand
Having the right items nearby prevents rushed repairs and keeps the machine stable during busy weeks.
Keep these supplies ready:
- Lint-free wipes and approved cleaning solution
- Spare wipers, caps, and dampers
- Extra gloves, microfiber cloths, and swabs
- A hygrometer for measuring humidity
- Silicone grease for seals (model-dependent)
- Replacement waste tank and maintenance parts
Just a small drawer of extras can save you from last-minute downtime.
Simple Habits That Add Years to Your Printer
You don’t need complicated procedures to keep a DTG printer healthy. Small daily habits make the biggest difference.
Easy habits that add lifespan:
- Keep the room clean and wipe up pretreat overspray
- Run the printer regularly rather than letting it sit
- Don’t force heavy cleans repeatedly when something looks wrong
- Log recurring issues so you can spot patterns early
- Close ink bottles and pretreat lids right after use
- Cover the printer during long idle periods
These small steps protect your nozzles, reduce wear on pumps, and keep pressure stable over time.
You can browse all related tutorials and troubleshooting guides in the DTG printing resource hub.
Final Checklist for a Healthy DTG Printer
When you follow a clear routine and watch for warning signs, your DTG printer stays healthier, prints better, and costs far less to maintain over time.
Quick Daily, Weekly, and Monthly Summary
A simple glance at this breakdown helps you stay organized without overthinking it.
Daily essentials:
- Fresh nozzle check
- Wipe caps, wipers, and maintenance station
- Circulate or shake white ink
- Control humidity between 40 to 60 percent
- Keep print area clean and dust-free
Weekly tasks:
- Deep clean caps and wipers
- Check ink lines and dampers for bubbles
- Inspect waste tank
- Clean pretreat overspray around the workspace
Monthly tasks:
- Replace worn caps, wipers, and filters
- Flush ink lines if needed
- Check airflow and humidity equipment
- Log part changes and recurring issues
This rhythm keeps your machine predictable and prevents expensive surprises.
Red Flags That Mean You Need Service Soon
Some issues shouldn’t wait. Ignoring them can damage the printhead or other internal parts.
Watch for:
- Persistent missing nozzles
- Channels that won’t recover after light cleans
- Visible ink leaks or wet spots in the capping area
- Heavy banding or unexpected color shifts
- Pumps running loudly or longer than usual
- Repeated purge cycles to clear nozzles
These signs almost always point to deeper problems that a technician should review.
How to Track Maintenance to Avoid Surprises
A simple log can save you from guessing when parts were last changed or when patterns started showing up.
You can track using:
- A notes app on your phone
- A whiteboard near the printer
- A printed checklist taped to the wall
- A digital spreadsheet for part replacements and dates
- Photos of nozzle checks for comparison over time
Tracking doesn’t have to be perfect. Even a rough log helps you catch problems early.
DTG Printer Clothing: Common Problems
Many DTG print issues start with the shirt, not the machine. Proper pretreat, controlled humidity, and quality blanks solve most clothing-related problems before they reach the printer.
Pretreat Stains or Box Marks
This usually happens when pretreat is applied too heavy or uneven. The shirt might show a shiny square or a darker patch after curing. It fades with washing, but it’s a sign you need to adjust your sprayer, reduce saturation, or level your application area.
Faded Prints or Weak Colors
If colors look washed out, the shirt may not have enough pretreat, or the garment may be too dry when cured. Some fabrics absorb ink unevenly, especially low-grade cotton blends. A quick fix is adding slightly more pretreat and making sure the shirt is fully dry before curing.
Ink Bleeding Into Fabric
Bleeding happens when the shirt absorbs too much moisture or the humidity is too high. Dark garments show this the most. Let the shirt cool completely, store blanks in a dry area, and avoid stacking freshly pretreated items.
Poor White Ink Coverage
Patchy whites usually come from unstable humidity, under-applied pretreat, or aged shirts absorbing pretreat inconsistently. Always test new blank batches because different brands behave differently even if the specs match.
Fibers Sticking to the Printhead
Loose fibers, lint, and fuzz can rub against the printhead and cause streaks or head strikes. Keeping shirts lint-rolled and storing blanks in sealed bins reduces the risk.
Rough or Scratchy Prints
When a DTG print feels rough, the pretreat is likely too heavy or over-cured. Adjust the heat press temperature and time, and be sure to use a foam insert or parchment to avoid crushing the fibers.
Troubleshooting Chart for DTG Garment Problems
| Problem | What It Looks Like | Most Likely Cause | Quick Fix | Prevent It Next Time |
|---|---|---|---|---|
| Pretreat Box Marks | Shiny square or darker rectangle after curing | Too much pretreat, uneven spray, over-pressing | Reduce pretreat amount, press with parchment | Calibrate sprayer, level your table |
| Faded Colors | Print looks washed out or dull | Low pretreat, fabric too dry, cheap blanks | Add more pretreat, re-cure properly | Store shirts better, test new blank batches |
| Weak White Ink Coverage | Patchy underbase, colors not popping | Humidity too low, pretreat too light, poor fabric | Increase humidity, apply more pretreat | Keep room at 40–60% humidity |
| Ink Bleeding | Colors feather into fabric edges | Shirt too damp, high humidity, over-pretreat | Let shirt dry fully, lower pretreat | Store blanks dry, run dehumidifier |
| Pretreat Stains | Dark wet-looking spots or blotches | Oversaturation, uneven spray, old shirts | Spray lighter, filter pretreat | Clean sprayer, shake pretreat often |
| Head Strikes | Smudged lines, sudden streaks | Loose fibers, wrinkles, raised areas | Lint-roll, pre-press shirt | Store blanks in sealed bins |
| Orange Peel Texture | Bumpy, uneven cured surface | Over-cure, too much pretreat | Lower heat/time, apply less pretreat | Balance your cure settings |
| Rough or Scratchy Prints | Print feels stiff or crusty | Over-curing or over-pretreat | Reduce temperature or time | Do test patches with each batch |
| Color Shifts | Reds look brown, blues look dull | Ink separation, outdated pretreat | Shake white ink, mix pretreat | Circulate daily, store liquids correctly |
| Blurry Edges | Soft or fuzzy outlines | Garment moisture, bad pretreat | Pre-press longer, reapply pretreat | Keep blanks dry, don’t stack pretreated shirts |