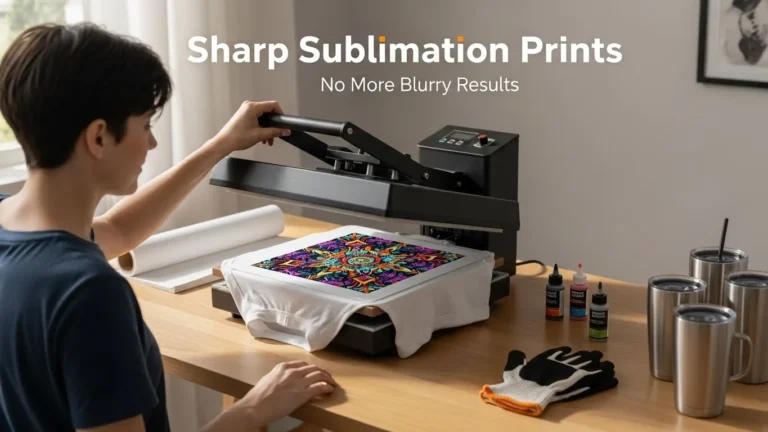
How to Choose the Right Heat Press Temperature for Sublimation
Heat press temperature plays a critical role in sublimation printing because heat is what activates sublimation ink and bonds it to polyester or coated surfaces. Even small temperature differences can change how vibrant, sharp, or durable a print becomes.
Instead of memorizing settings, it’s more important to understand how temperature affects the sublimation process and how to adjust your press when results aren’t perfect.
This guide explains:
- how heat activates sublimation ink
- why different materials need different temperatures
- how to adjust heat press settings safely
- how to troubleshoot temperature-related print issues
If you need exact settings for materials, see the complete sublimation temperature chart.
If your colors still look off after pressing, a sublimation color chart can help pinpoint where the problem starts.
Materials and Tools Used in Sublimation
- 100% polyester shirts
- Poly-blend shirts
- Ceramic mugs
- Metal tumblers
- Glass blanks
- MDF panels
- Sublimation paper
- Sublimation ink
- Heat-resistant tape
- Protective paper
- Pressing pillow
- Infrared thermometer
- Silicone sleeves
- Heat Press Machine

7 Pro Tips for Mastering Heat Press Temperature
Achieving perfect sublimation results depends heavily on precise temperature control. Follow these expert tips to ensure vibrant, long-lasting transfers every time:
1. Always Start with Manufacturer Guidelines
- Check the recommended temperature range for your specific substrate (mug, shirt, etc.).
- Begin at the lower end of the range and adjust gradually to avoid scorching or fading.
2. Use the Gradual Increase Method
- Start with a low temperature and increase in 5–10°F (3–5°C) increments between test presses.
- This prevents overheating and helps find the sweet spot for color vibrancy.
3. Balance Time & Temperature
- Lower temp? Increase press time slightly.
- Higher temp? Reduce press time to avoid dye migration or scorching.
- Example: 380°F for 45 sec vs. 400°F for 30 sec (adjust based on material).
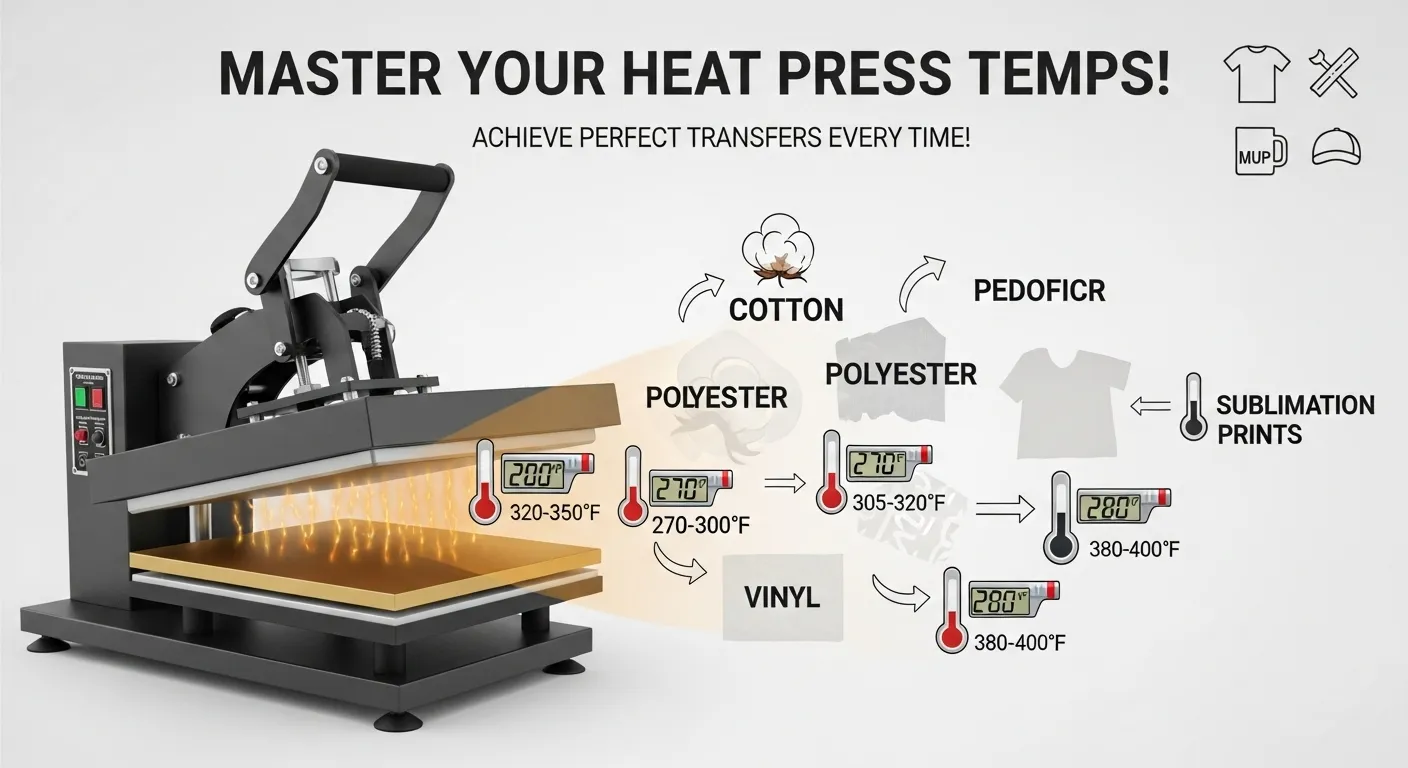
4. Adjust for Different Materials
- Polyester fabric: Higher polyester content = slightly lower temps.
- Ceramics/Metals: Require steady heat for full ink penetration.
- Plastics/Hardboard: Easily damaged—strictly follow guidelines.
5. Test, Test, and Test Again!
- Never skip test prints—waste one blank to save a whole batch.
- Keep a log of settings (temp, time, pressure, results) for future reference.
6. Prevent Dye Migration & Scorching
- Dye migration (color bleeding) happens when heat is too high, stay within recommended ranges.
- Scorching/yellowing? Reduce temperature or press time.
- Blurry prints? Likely too much heat or shifting during pressing.
7. Use Extra Heat Press Hacks
- Pre-press fabrics to remove moisture and wrinkles.
- Verify actual temp with an infrared thermometer (heat press dials can be inaccurate).
- Cold peel vs. hot peel? Follow transfer paper instructions for best durability.
Final Tip: Consistency is Key!
- Small adjustments make a big difference, track your settings and refine over time.
🔥 Master these tips, and your sublimation prints will always look professional and vibrant!
If you’re new to this craft, you can start with our Introduction to Sublimation Printing to understand the basics before dialing in your heat press settings.
How Heat Activates Sublimation Ink
Sublimation ink is designed to convert from a solid directly into a gas when exposed to high heat. This process is called sublimation.
When the heat press reaches the correct temperature:
- the dye turns into gas
- the gas penetrates polyester fibers or polymer coatings
- the dye solidifies inside the material as it cools
This is why sublimation prints do not crack or peel like vinyl transfers.
If the temperature is too low, the ink cannot fully convert to gas.
If it is too high, the coating or fabric can scorch.
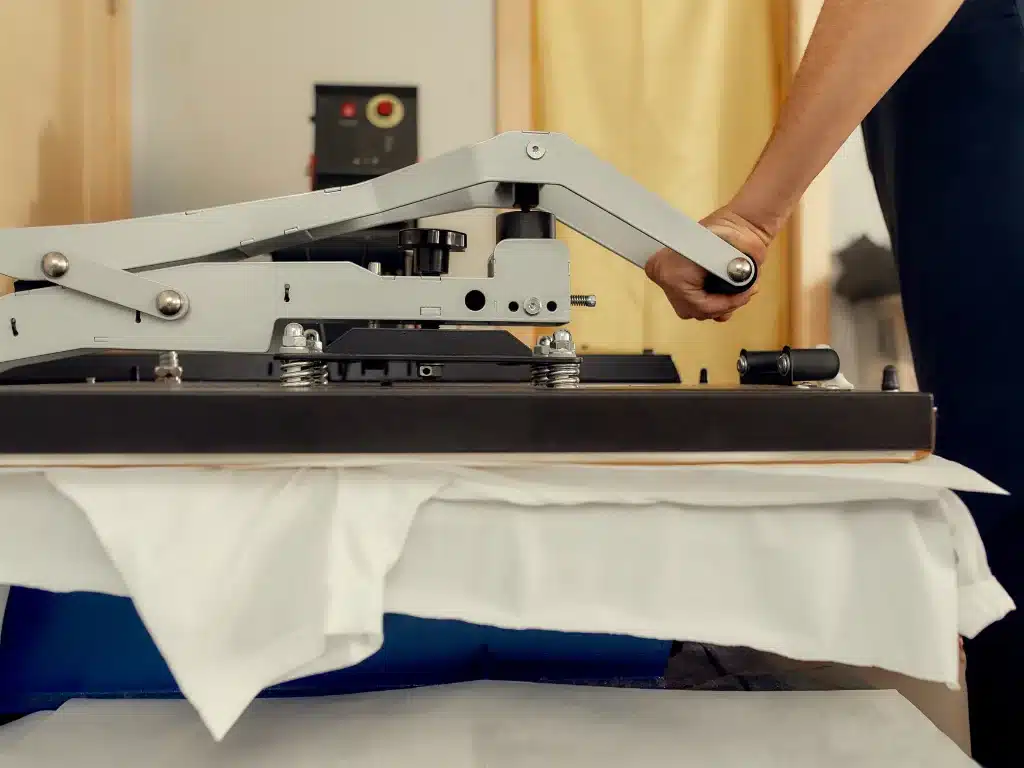
Fabric Prep and Test Press Setup
A fast pre-press and a simple test print save more blanks than any single trick. Once your fabric is flat, dry, and clean, your colors come out sharper and your press behaves predictably every time.
How to Prep Your Fabric Before Pressing
- Pre-press for 3–5 seconds to release hidden moisture and smooth the fibers.
- Lint roll thoroughly, especially on polyester, so no blue dots burn into the print.
- Slide a pressing sheet inside the shirt to stop ink bleed-through.
- Keep the print area flat by shifting the shirt so seams, collars, and hems aren’t under the platen.
How to Set Up a Proper Test Press
- Use a small scrap or test square from the same fabric or shirt batch.
- Check temperature accuracy with an infrared thermometer across multiple points.
- Adjust one variable at a time (temp, time, or pressure) so you know what fixed the issue.
- Record your results in a log with the final settings that worked best.
Want better color accuracy? Switch to ICC color profiles tailored to your printer and ink combo. Also, if you’re working on cotton, use HTV, EasySubli, or coated polysheets to make the design stick.
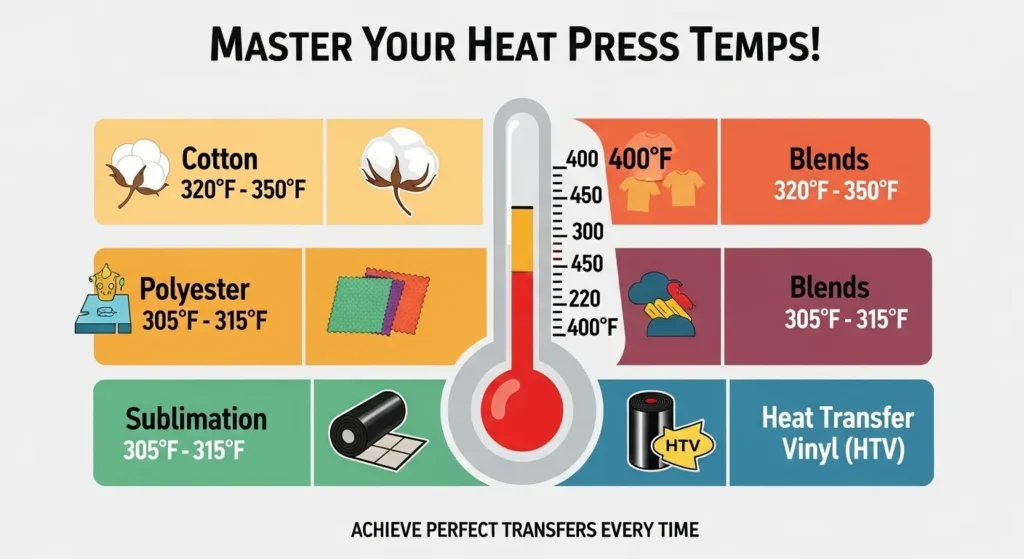
Why Different Materials Need Different Temperatures
Not every sublimation blank reacts to heat the same way.
Three factors influence the required temperature:
Material composition
Polyester absorbs sublimation dye easily, while cotton does not. Materials with less polyester require careful temperature control to avoid damage.
Coating thickness
Hard surfaces like mugs or metal panels have polymer coatings that must reach activation temperature before dye bonding occurs.
Heat absorption
Glass, ceramic, and metal absorb heat more slowly than fabric, which is why they often require longer pressing times.

Before adjusting temperatures, make sure your machine is configured correctly using this sublimation heat press setup guide.
Why Heat Press Temperatures Are Often Inaccurate
Most heat presses run 10–25°F different from the display temperature, which can lead to inconsistent results.
Every heat press has its own personality. Some run hotter than the display, some run cooler, and a few swing up and down during a single press.
If your prints look faded, overcooked, or inconsistent even when you follow the charts perfectly, temperature variance is almost always the real reason.
Why Heat Presses Don’t Match Their Display
1. Inaccurate factory thermostats
Budget presses often ship with inexpensive sensors. They read the temperature at the thermostat, not the actual platen surface where your blank sits.
2. Hot and cold zones across the platen
It’s normal for the center to be hotter than the edges by 10–25°F. This is why the middle of a shirt pops with color while the corners look soft.
3. Heat loss when the press opens
The longer your press stays open between items, the more temperature swings you’ll see. Those swings show up instantly in your prints.
4. Age and wear on heat coils
Older presses warm unevenly. You might get stripes or patches where the color looks weaker.
How to Check Your Real Temperature (Quick Calibration)
You can figure out what your press is really doing in just a couple minutes.
- Use an infrared thermometer and take readings across the surface: top-left, top-right, center, bottom-left, bottom-right.
- Compare these numbers with your press’s digital display.
- If you see a difference greater than 10–15°F, adjust your settings or reposition your blanks toward the center.
- Repeat readings every few weeks if you press daily.
What to Adjust When Your Press Runs Hot or Cold
If your press runs hot:
- Lower temp by 10–15°F
- Reduce press time by 5–10 seconds
- Watch for yellowing around seams
If your press runs cold:
- Increase temp by 10–20°F
- Increase time slightly (5–15 sec)
- Faded colors are your biggest clue
Real Shop Example
A customer pressed polyester shirts at 400°F, but the colors kept coming out dull. When we checked their press with an IR thermometer, the platen was actually 362–370°F. After raising the set temperature to 415°F, the shirts finally hit the target range and the print vibrancy jumped noticeably.
Quick Pro Tip
Once you find the sweet spot for your press, write it down. Every model behaves differently, and dialing in your “true temp” is the easiest way to get consistent, studio-quality color every time.
Different substrates react differently to heat, which is why it helps to review this sublimation materials guide.
How to Check and Adjust Your Heat Press Temperature
Accurate temperature is the difference between sharp, vibrant prints and washed-out colors. Here’s the simple calibration process used in production shops to make sure your press hits the correct temperature every time.

1. Pre-press the fabric or test material
Press your test fabric for 3–5 seconds to clear moisture and flatten the surface. This keeps your calibration results clean.
2. Clean the test area
Lint, dust, and loose fibers can spoil test prints. Roll the fabric thoroughly before placing your transfer.
3. Position the transfer and protect the surface
Add protective paper inside and on top of the shirt. Tape the transfer so it won’t shift when the press closes.
4. Run a quick test press
Use your normal sublimation settings on a small scrap piece. Look for dull colors, faded spots, or uneven transfers.
5. Measure the platen temperature
Use an infrared thermometer to check multiple spots:
- Center
- Top left
- Top right
- Bottom left
- Bottom right
If any area is off by more than 10–15°F, your display isn’t accurate.
6. Adjust your temperature settings
- If your heat press runs cold, increase set temp by 10–20°F.
- If it runs hot, reduce the set temp by 10–15°F.
Make small adjustments until your real surface temp matches your target.
7. Save your temperature presets
Once your press consistently reaches the right heat:
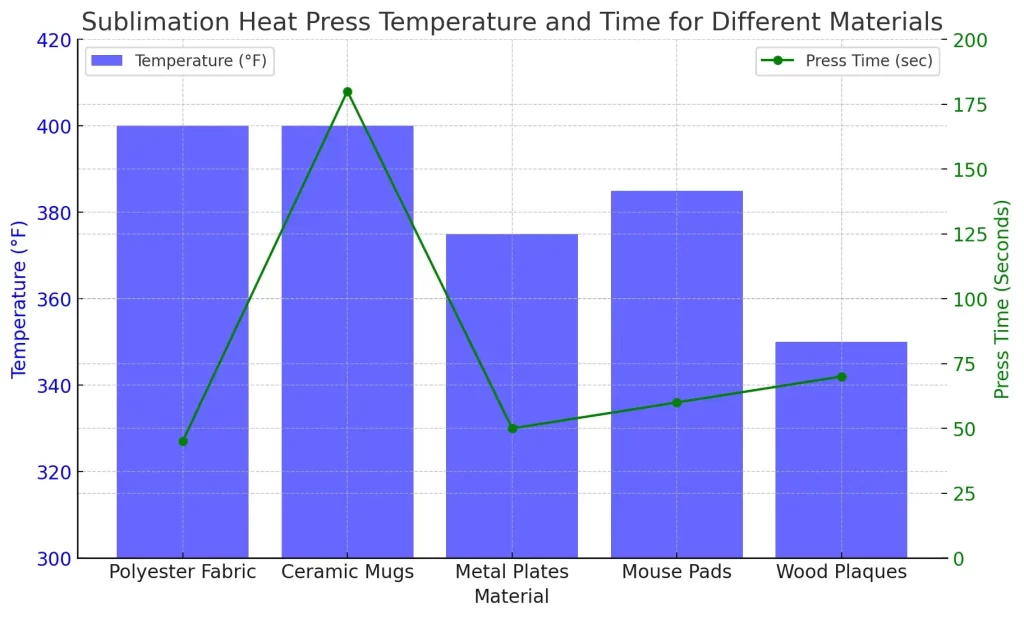
- Polyester shirts → 380–400°F
- Mugs → 385–400°F
- Metal panels → 400–425°F
Save these as presets if your press allows it.
8. Print your actual item
After calibration is dialed in, run your real sublimation print for consistent and vibrant results.
How Temperature Problems Affect Sublimation Prints
Most sublimation issues trace back to heat that’s either too high, too low, or uneven across the platen. Even a 10–15°F swing can change how the ink transfers. If your colors, edges, or textures look off, this section helps you pinpoint the exact temperature mistake behind the result.

1. Faded or Washed-Out Colors
This is the classic sign your press is running too cool or the heat isn’t reaching the coating evenly.
What it looks like:
Soft edges, dull colors, light patches, or incomplete transfers.
Fix it:
- Increase temp by 10–20°F
- Add 5–15 seconds of press time
- Move the blank toward the center of the platen
- Check actual heat with an IR thermometer
2. Overcooked or Brownish Prints
Heat that’s too high “cooks” certain dyes, especially reds, skin tones, and light pastels.
What it looks like:
Brown tint, burnt-looking shadows, or yellow stains around seams.
Fix it:
- Lower temp by 10–15°F
- Cut 10–20 seconds off your time
- Pre-press briefly to remove moisture
3. Ghosting or Double-Shadows
This happens when the paper shifts or the ink re-gasses after the press opens.
What it looks like:
A faint second image, blurred edge, or light shadow next to the design.
Fix it:
- Tape the transfer firmly
- Increase pressure slightly
- Open the press smoothly, don’t jerk
- Let the paper cool before removing
4. Blotchy or Patchy Transfers
Uneven heat zones or moisture pockets cause these random light spots.
What it looks like:
Small irregular patches where color didn’t bond.
Fix it:
- Pre-press the material for 3–5 seconds
- Use a silicone pad under hard surfaces
- Take multiple temperature readings across the platen
5. Banding or Lines in the Print
This usually means the coating didn’t reach full activation temperature.
What it looks like:
Horizontal or vertical lines, mostly on metal panels or tumblers.
Fix it:
- Increase heat or time slightly
- Rotate the tumbler during oven presses
- Shift the panel away from cold edges
6. Warping or Bowing (Hard Surfaces)
Too much heat for too long bends MDF, acrylic, and even metal.
What it looks like:
Curved edges, lifted corners, uneven prints.
Fix it:
- Lower temp
- Add a cooling board after pressing
- Use medium pressure rather than firm
If prints still look faded or uneven, follow this sublimation troubleshooting guide
Quick Pro Tip
Whenever you troubleshoot, change only one variable at a time. If you adjust temp, time, and pressure all at once, you won’t know which fix worked. One small tweak usually solves the whole issue.
Production Tips for Consistent Temperature
Smart workflows beat trial and error. Once you master temperature, moisture, pressure, and alignment, your sublimation setup becomes predictable, and that’s when prints start looking truly professional.
1. Trust the Print, Not the Display
Most heat presses lie by 10–25°F. Always spot-check the platen with an infrared thermometer. If colors look weak, assume the press is cooler than it claims and bump the temp a little.
2. Pre-Press Anything That Can Hold Moisture
Polyester shirts, neoprene, canvas, and linen carry moisture you can’t see. A quick 3–5 second pre-press stops ghosting, blotching, and random blue dots.
3. Tape Like You Mean It
If your transfer shifts even a millimeter, you get ghosting. Use heat tape at the top, bottom, and seam area. For tumblers, wrap snugly and use two anchor points.
4. Keep a Settings Log
Every material has a sweet spot. Record temp, time, pressure, and results. In a month, you’ll have a custom “Bible” for your press and fewer ruined blanks.
5. Press Shirts Off the Seams
Buttons, collars, hems, and shoulder seams lift the platen and cause uneven color. Slide a pressing pillow inside or shift the shirt so the print area sits perfectly flat.
6. Cool Hard Surfaces Slowly
Metal and glass crack, cloud, or warp if cooled too fast. Move them to a flat surface and let them settle naturally. No fans, no cold tables.
7. Rotate Tumblers in Ovens
Oven heat circles the chamber unevenly, so rotate once halfway through. It’ll fix those vertical “cold lines” instantly.
8. Replace Blowout Paper Often
Reusing protective sheets traps ink and leaves faint old designs on new prints. Fresh paper keeps everything crisp.
9. Don’t Over-Press to “Fix” Dull Prints
If colors look weak, increase heat slightly—not time. Too much time washes the design out and can brown the coating.
10. When in Doubt, Test a Scrap
A single wasted blank is better than a wasted box. Quick tests pay for themselves in fewer failures and faster workflows.
Care and Longevity Tips
The right press settings don’t just make your prints look good, they help them last longer too. But care after pressing matters just as much.
For apparel, always wash in cold water, turn garments inside-out, and avoid bleach or harsh detergents. This preserves both color and fabric quality over time.
Hard-surface items like mugs, tumblers, and metal signs should be hand-washed only. Dishwashers can wear down the coating and fade the design early.
When temperature, time, and pressure are dialed in correctly during sublimation, the transfer bonds deep into the surface. That’s what gives your prints their sharp edges and long-lasting vibrancy, wash after wash, sip after sip.
Many beginners struggle because of simple setup errors like those explained in heat press mistakes that ruin transfers.
FAQs:
Why does sublimation require high heat?
Sublimation ink only converts into gas at high temperatures. The heat press provides the energy needed for the dye to penetrate polyester fibers or polymer coatings.
What happens if sublimation temperature is too low?
Low temperature prevents the dye from fully vaporizing, which causes faded or incomplete transfers.
Why do some heat presses show the wrong temperature?
Many presses measure temperature near the heating element instead of the platen surface, which can create differences of 10–25°F.
How can I test my heat press temperature?
Use an infrared thermometer to check multiple points across the platen and compare them with the display temperature.


12 Comments