Halloween Sublimation Garden Flags: Double-Sided DIY Guide

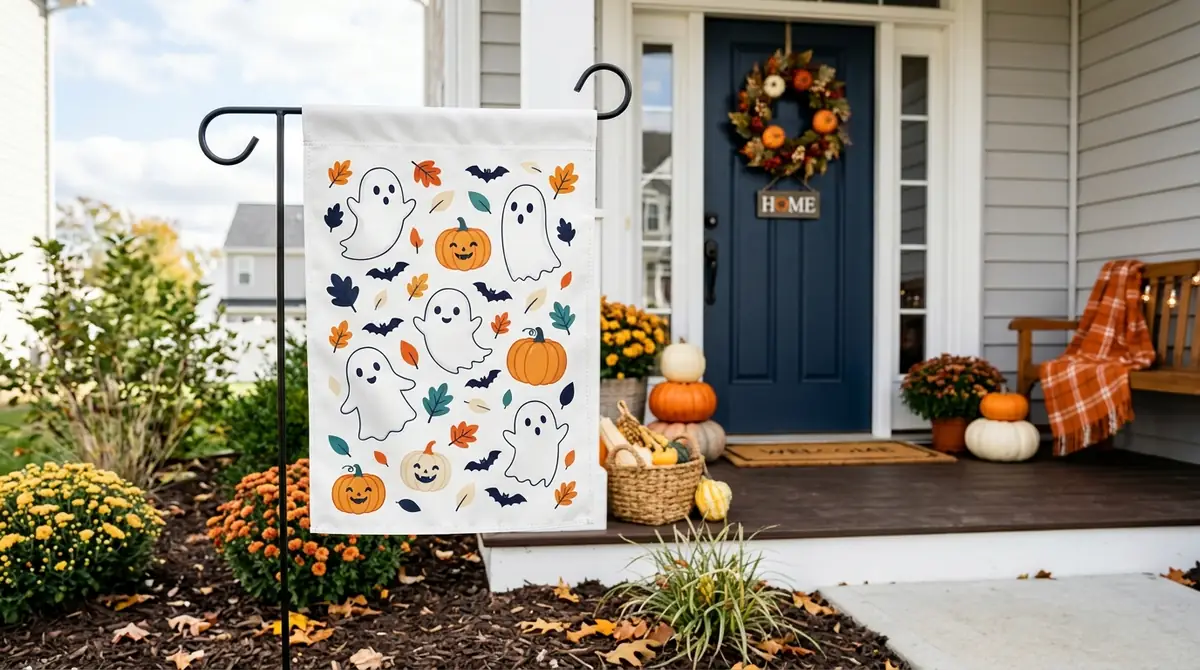
Halloween sublimation garden flags look simple until you print the second side. An otherwise crisp ghost or pumpkin design can develop a blurry shadow, a visible paper seam, or a mark where the flag’s rod pocket interrupted the heat press. Start with a double-sided sublimation-ready polyester flag, measure its usable print area, then print and press each face using that blank’s instructions. Cool the first side before transferring the second, and replace protective paper every time.
This tutorial covers design orientation, two-sided alignment, blank-specific heat settings, and the mistakes that spoil Halloween flags. For other quick seasonal projects, see our Halloween sublimation ideas.
Choose a Flag Blank That Can Be Printed on Both Sides
Not every white polyester garden flag supports two separate designs. Some lightweight flags are intended for one image that shows through in reverse. For legible lettering on both sides, look for a product explicitly described as double-sided or two-ply for sublimation.
| Blank type | What to expect | Check before ordering |
|---|---|---|
| Single-layer polyester flag | A printed image may show through the reverse; results depend on material weight | Whether the supplier approves a second transfer |
| Double-sided polyester flag | Designed for separate front and back designs | Pressing directions for both faces |
| Double-ply or layered flag with light-blocking middle | Can reduce show-through between opposing artwork | Construction, pressing limits and usable design area |
| Ordinary cotton or unknown fabric | Not a reliable standard dye-sublimation blank | Choose a verified polyester sublimation product instead |
For example, Twisted Ink Gifts’ 600D 12 × 18-inch flag is sold as a double-sided sublimation blank and includes instructions to cool before pressing the reverse. Different flags can be 11 × 15, 11 × 18, or 12 × 18 inches, but nominal dimensions are not necessarily the printable area.
Measure the Garden Flag Before Designing
Lay the blank flat. Measure the full width and height, then the rod pocket, side stitching and bottom hem. The main text and artwork should fit in the flat print area, not across a raised seam.
| Record this measurement | Your flag |
|---|---|
| Overall width and height | _____ × _____ inches |
| Top rod-pocket depth | _____ inches |
| Clear width between side hems | _____ inches |
| Usable height below rod pocket | _____ inches |
| Planned design width and height | _____ × _____ inches |
Example, not a universal template: If a flag is 18 inches tall and its pocket occupies 2 inches, the space beneath the pocket is 16 inches tall before subtracting design margins. A half-inch clear margin at both ends would leave a planned design height of 15 inches. Measure your actual blank rather than copying those numbers.
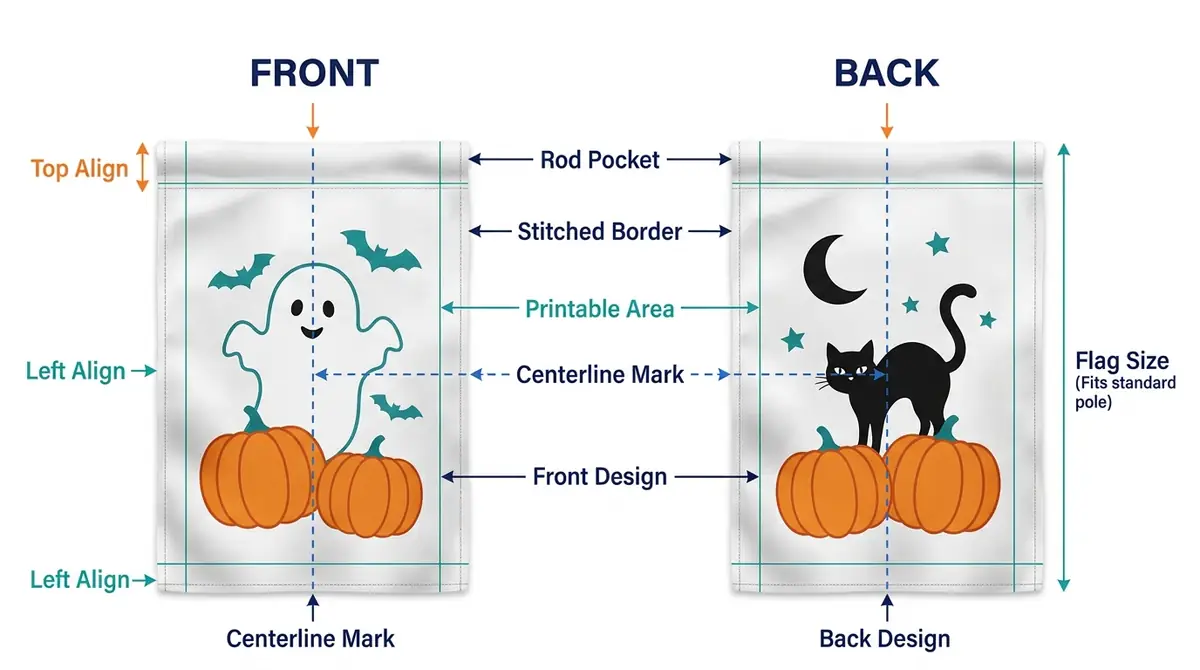
Make separate files for the front and back with readable lettering in the design editor. Mirror each printed sublimation transfer once, when the print workflow requires it. Use the image resolution and print-size checker to check whether your artwork will remain sharp at its finished dimensions.
Download the Double-Sided Flag Layout and Press Checklist
The printable two-page worksheet includes front and back design maps, space for rod-pocket measurements, a paper-orientation check, and separate press records for both sides. Use it with your actual blank’s instruction sheet.
If you make seasonal flags for customers, keep the completed worksheet with the product SKU and settings. You can also record the results in our sublimation temperature tracker.
Garden Flag Time and Temperature: Use Your Supplier’s Instructions
There is no one time, temperature, or pressure combination for every polyester garden flag. Construction, fabric weight, equipment and transfer method differ. The table below gives published examples, not a setting that should be applied to unrelated blanks.
| Documented example | Temperature | Time | Important detail |
|---|---|---|---|
| HeatPressNation’s garden-flag project | 385°F | 50 seconds | Medium pressure; tutorial uses polyester and a specific press workflow |
| Artesprix Halloween garden flag | 400°F | 55 seconds | Sublimation marker workflow on its featured garden flag |
| Twisted Ink 600D double-sided blank | 400°F | 70 seconds | Heavy pressure, separate pre-press and cooling before side two |
These are different products and workflows. Do not combine the time from one supplier with the temperature from another. If your blank includes different double-sided instructions, follow the instructions that came with your blank.
How to Sublimate a Halloween Garden Flag on Both Sides
1. Prepare the two designs
Build a front design and a back design for the measured printable area. Save them separately. Check that family names and Halloween lettering are legible in the normal design view, then verify that the printed transfer is mirrored as required. A short message and one large ghost or pumpkin are easier to read outdoors than tiny decorative text.
2. Lint-roll and prepare the blank
Remove lint, loose threads and debris from both printable faces. Flatten wrinkles only according to the blank maker’s pre-press instructions. Avoid positioning a thick rod-pocket seam within the design area, since a raised seam can create uneven pressure.
3. Build a clean protective-paper stack
Place fresh, suitable blowout or protective paper under the flag and above the secured transfer, following your supplier’s prescribed transfer orientation. Protective paper catches excess dye and helps keep the platen and opposite face clean. A printed or contaminated sheet should never be reused for the reverse.
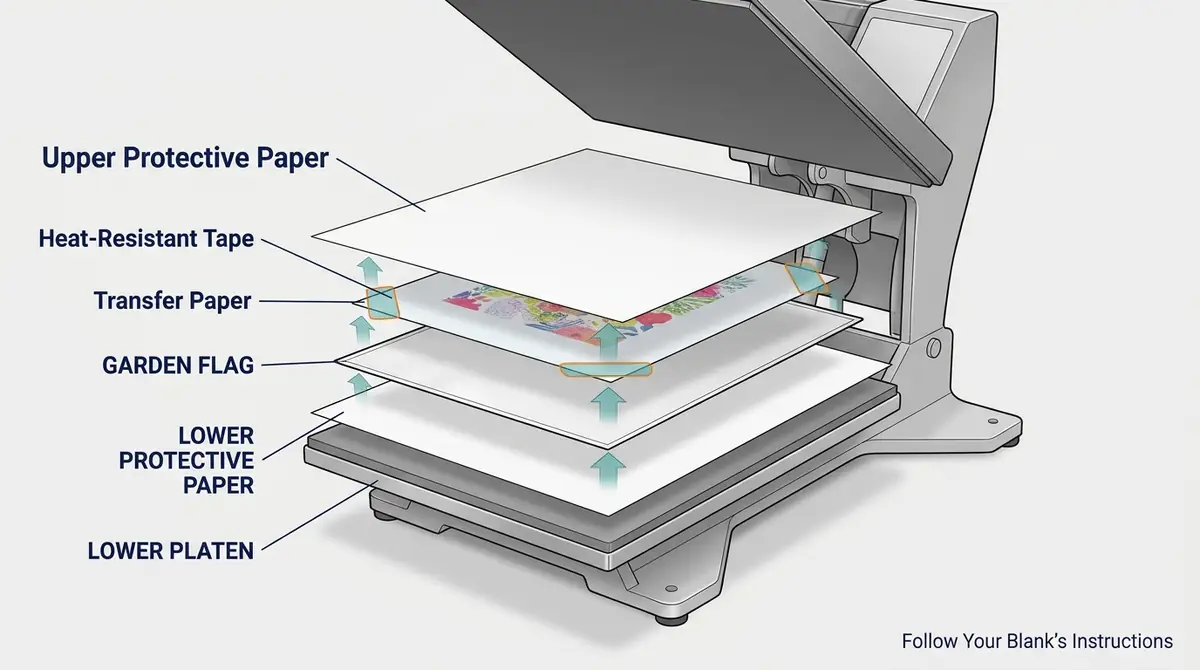
The sublimation protective paper guide explains which papers are suitable and why clean sheets matter. Press-stack illustrations are conceptual; placement and transfer orientation must match your selected blank’s instructions.
4. Secure and press the first face
Tape the transfer only where the manufacturer permits, keeping the printed design flat. Check that your press covers the entire transfer or that your equipment has an approved multi-section workflow. Apply the exact temperature, time and pressure provided for that flag, then open the press without dragging the paper across the hot fabric.
5. Cool the first side before handling the second
Wait for the cooling step specified by your supplier. Twisted Ink explicitly says to cool its double-sided flag before pressing side two. Jennifer Maker’s double-sided garden flag instructions also stress cooling before removing the transfer and using fresh protective paper for the reverse.
6. Align and press the second face
Flip the cooled flag and align its second design using the same measured top and side references. Replace the protective paper beneath and above the project. Secure the new transfer and repeat only the approved second-side procedure. The first print may be heated again during this step, so check the manufacturer-approved method for your flag construction.
7. Inspect both sides and fit the flag stand
After cooling, check for double edges, washed-out areas, unwanted show-through and marks near the pocket. Make sure both messages read correctly from their intended viewing directions. Slide the flag onto a stand that fits the rod pocket, without forcing the fabric.
Three Halloween Designs That Work Well on Garden Flags
- Ghost family welcome: A large friendly ghost above a surname on the front, and a simple pumpkin and ghost pattern on the back.
- Trick-or-treat entrance: Pumpkins with “Trick or Treaters Welcome” on one side and a coordinating “Happy Halloween” design on the other.
- Black cat and moon: A bold cat silhouette for the front and an original haunted-house illustration for the back. Keep important wording well below the rod pocket.
Original art or properly licensed graphics are the safest starting point for customer orders. Strong contrast and large lettering make a flag readable from the sidewalk.
Troubleshooting Double-Sided Sublimation Garden Flags
| What you see | Check first | Better next step |
|---|---|---|
| Double outlines around ghosts or text | Paper moved on release | Secure the transfer and lift it without shifting |
| Image shows through onto the other side | Thin fabric or unsuitable construction | Confirm the blank is designed for two independent prints |
| First side fades after printing the back | First print received extra heat | Follow double-sided process and cooling requirements |
| Pale stripe near top | Raised rod pocket or stitching | Move artwork into the flat printable region |
| Paper seam visible in large artwork | Tiled transfers were misaligned | Use careful registration or a larger compatible printer |
| Blotches or stray color | Dirty protective paper or transferred dye | Replace both protective sheets before each press |
A second pass with hotter settings is not a safe automatic fix. First check the blank, transfer stability and press contact. The sublimation troubleshooting chart can help separate pressure problems from printer or color problems.
Frequently Asked Questions
Can you sublimate both sides of a Halloween garden flag?
Yes, when the blank’s manufacturer supports double-sided sublimation. Press each face separately, use clean protection, and follow the cooling directions. A thin single-sided flag may show reversed color through the back rather than producing two independent designs.
Should both garden flag designs be mirrored?
Create front and back artwork in their normal readable orientation. For a face-down sublimation transfer, mirror each file when printing. Check text before pressing so neither side appears backward.
Will an 8.5 × 11-inch printer work for a garden flag?
It can print a smaller design that fits within its supported sheet size. For a full-face design you may need larger sublimation paper, a compatible wide-format printer, or an approved tiled-transfer approach. Tiled designs add alignment and seam risks.
How do you prevent ghosting on the second side?
Secure the paper, avoid moving the hot transfer, allow the first print to cool as instructed and replace the protective sheets. A flag engineered for double-sided printing offers a better starting point than a light single-layer blank.
Can a Halloween sublimation garden flag stay outdoors all month?
Outdoor durability depends on the exact fabric, coating, sunlight exposure and weather. Confirm the supplier’s care and outdoor-use recommendations rather than assuming every sublimation flag is permanently fade-proof.
A Better Result Starts with the Blank and the Press Record
For a readable Halloween garden flag on both sides, measure the real print area, prepare two correctly oriented transfers and use manufacturer-specific pressing instructions. The most useful record is the product SKU, which side you pressed first, the protective-paper setup and what happened after the second press.
Keep your front and back layout sheet beside the heat press until the last flag is finished. That prevents the next design from being aligned against the wrong edge.
Manufacturer Instructions and Disclosure
The pressing examples and double-sided handling notes are drawn from HeatPressNation, Artesprix, Twisted Ink Gifts and Jennifer Maker’s documented workflow. They describe different blanks and equipment. The artwork and diagrams are illustrative, and Subli Genius Print does not claim independent hands-on comparison testing of these products. Confirm current instructions for the exact flag before production.